Set up Plex remote access with a GL.iNet Flint 2 router
Plex has built-in remote access that mostly just works, but you still have to configure your router to use it properly. Here is a quick guide on configuring a GL.iNet Flint 2 router, which probably also works with other GL.iNet routers using the same GUI.
Table of Contents
About Plex and Remote Access
Plex Media Server is a self-hosted media server that lets you stream your owned (ripped, downloaded, or otherwise acquired) media from other devices on the same network, through a web-based GUI (access via browser) or dedicated app. (Say, on a smart TV or Roku device.) Plex lets you stream videos and music through a slick Netflix-like user interface, and Plex also offers the excellent Plexamp music player app for Android and iOS devices, so you can stream music on the go through a dedicated UI. All metadata including media details, episode/track lists, movie/album art, etc. is handled by Plex automatically.
Plex Media Server has a built-in feature called Remote Access that can be configured from the web UI. By enabling Remote Access, and forwarding network port 32400 from your router (we’ll get to that), you can access Plex from other devices using your account, like a phone or tablet. Setting up remote access also allows you to share your media library externally with other Plex users, so they can access your server and stream the shared content directly from you.
[warning] Important!
The remote access feature, and sharing your library with friends, requires either a Plex Pass subscription for the person running Plex Media Server, or any external users you’ve shared with will each require a Remote Watch Pass subscription.
Another caveat to note is that Plex remote access will not work if your Plex Media Server is behind CGNAT. Many ISPs put their users behind CGNAT unless they have a static IP address, but this often comes at an additional cost. Check with your ISP for details.
If you want to remotely access Plex for yourself through CGNAT, I suggest using Tailscale — see this blog post for a guide on setting that up. To then share your library with friends, they would normally have to run Tailscale themselves too, but there is another way if you’re willing to work for it — see this other post for details.
About GL.iNet Flint 2
GL.iNet is a manufacturer of innovative networking hardware based on open-source software, including home and travel routers, IoT and security gateways, KVM devices, and more. The GL-MT6000 Flint 2 is one of their premiere products, built on top of OpenWRT and boasting many modern features.
Among other things, it lets you configure firewall rules, port forwarding, and universal plug and play. (We will not be using UPnP though — you should never use it!)
Pre-Requisites
This guide assumes you already have the Flint 2 (or whatever router you’re using) up and running. I won’t go into setting up the Flint 2 from scratch for a first time user. (Maybe I’ll write a post about it if there is interest, or I ever get another GL.iNet product.)
Likewise, this guide assumes you already have a Plex Media Server already set up and running. I won’t go into how to install Plex here, see this blog post for detailed instructions on running Plex as a Docker container in Linux.
Port forwarding on Flint 2 router
Plex Media Server uses network port 32400 for everything: to communicate with the Plex servers (for auth, metadata, etc.), to expose the web-based user interface, and for remote access. As a result, 32400 the only port we need to open to the internet, or WAN, and forward to the Plex Media Server on the internal network, or LAN.
Although I’m providing instructions specifically for the GL.iNet Flint 2 (which I assume should work identically or at least similarly on other GL.iNet hardware), it should still help with other routers as long as they’re capable of port forwarding; not all routers can do it, but those that can do it mostly do it the same.
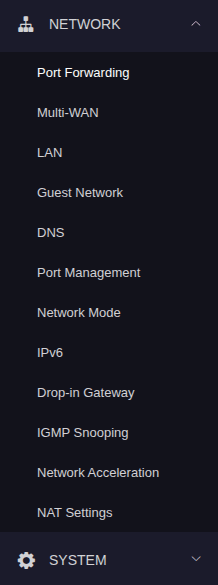
On your browser, go to your Flint 2 router’s web UI (most likely something like http://192.168.0.1) and login. On the sidebar to the left, click on Network to open a dropdown, then go to Port Forwarding.
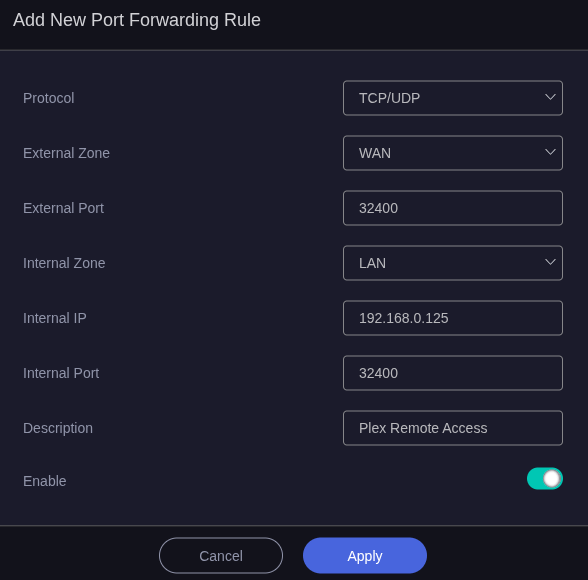
On this page, ignore the DMZ section and under Port Forwarding click on the + Add button. You should fill out the information like so:
Leave the Protocol as TCP/UDP, and leave External Zone as WAN.
For the External Port type in the Plex port,
32400.For the Internal Zone, leave it as LAN.
For the Internal IP type in the Plex server’s internal IP address, for example
192.168.0.125.For the Internal Port type in the Plex port again,
32400.Add a Description if you want, make the Enable is toggled on, and click Apply.
If you prefer, you can forward a different external port, like
50000or whatever, to Plex’s internal port of 32400. It may be a little more secure not to use Plex’s default port, but I myself don’t bother.Plex seems to do a good job of securing it’s remote access and I’ve never personally heard of anyone getting breached through Plex and port 32400. The choice is yours, though. If you go this route, you’ll just have to make one extra change in Plex Media Server, which I’ll get to later.
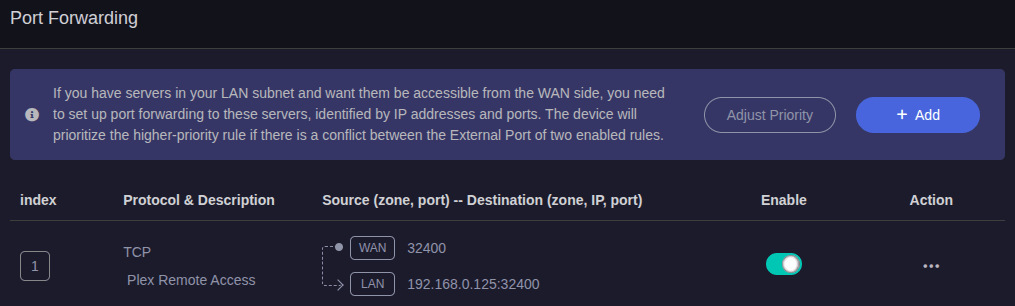
Now you should see the new port forward you added.
We’re done here. Now let’s configure Plex.
Configuring the Plex Media Server for remote access
Go to your Plex Media Server’s web-based user interface (server settings can only be changed here, not through any of the apps), probably by going to the internal IP address of the Plex server on a browser, for example http://192.168.0.125:32400/web.
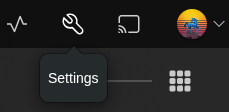
Click on the wrench icon at the top right of the window to get into the Plex server settings.
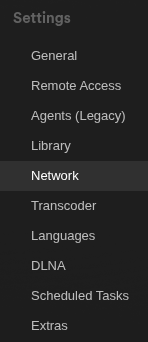
Now on the sidebar to the left, scroll down to Settings and go to Network.
First things first, secure connections is probably set to Required. This is the default setting and should work without issue, but some older clients not have trouble connecting. If any of your devices, or devices of friends you’ve shared with, are unable to connect in the future you can change this to Preferred and it should work. Modern clients should be able to connect securely, though.

Next, scroll down to where it says Enable Relay. If this setting is on, and a remote Plex client is unable to establish a direct connection, Plex’s own servers will relay the connection to allow access. This should not be necessary if you set up Plex Remote Access properly, and Plex relays have an upper bandwidth limit of around 4 Mbps, so it’s not an ideal experience anyway.
Personally, I always uncheck the box to turn off relay to force a direct connection, or else not allow access at all if direct is not possible.

You can customize some other settings here to your liking, but since we are just port forwarding from the router, nothing else is required here. On the sidebar, go to Remote Access. On this page, click on the button to Enable Remote Access.
You should also enable Manually specify public port, type in the Plex port and click Apply. It may not be required for everyone, but remote access doesn’t work for me without it.

If you’re setting things up differently and forwarding another outside port (rather than
32400) to Plex’s internal port, then type in that outside port here.In that case the above would be
[internal IP]:32400 <- [external IP]:50000 <- Internetif you were forwarding external port 50000 on the router to Plex’s internal port of 32400.
Give it a minute and you should see it say Fully accessible outside your network in green.
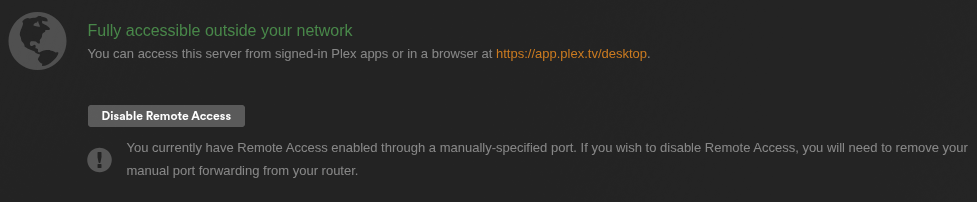
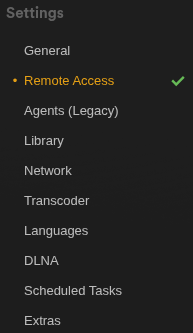
If you see this message remain and not turn red saying “Not available outside your network,” then you’re good to go. You should also see a green checkmark next to Remote Access on the sidebar.
There is an alternate method of exposing Plex for remote access, where you use a custom domain and reverse proxy, ideally with TLS certificates, to forward external port 443 to Plex’s internal port 32400.
Some people believe this is more secure, but I don’t agree — 32400 is well-known to only be used for Plex, and Plex themselves are good about securing their servers and apps, whereas exposing port 443 paints a giant beacon on your IP address that every bot will scan incessantly forever.
All that extra effort just to make yourself more noticeable to the internet does not sounds like a good idea to me, so I don’t suggest it and won’t explain how to do it here. There are many other guides available if you decide to go that route.