How I set up a home server for self-hosting and as a NAS with secure remote access via Tailscale
Updated
I turned my old Dell PC into an all-in-one home server and network attached storage to self-host all my data, my photos, and my media library, running Home Assistant, Plex and other services, all securely accessible from outside my home with Tailscale.
Table of Contents
Server hardware and software
My old desktop PC turned server is a Dell XPS 8920 with an Intel i7-7700 CPU and 24 GB of DDR4 RAM. (I removed the AMD RX 480 GPU it came with, since I was not going to use it.) I installed Debian 12 Bookworm on the M.2 NVMe drive and added hard drives to every available SATA port, including replacing the CD-ROM with another HDD. Additional hard drives are connected via two external docks each holding two HDDs, both connected to USB 3.1 ports utilizing USB Attached SCSI. (UASP)
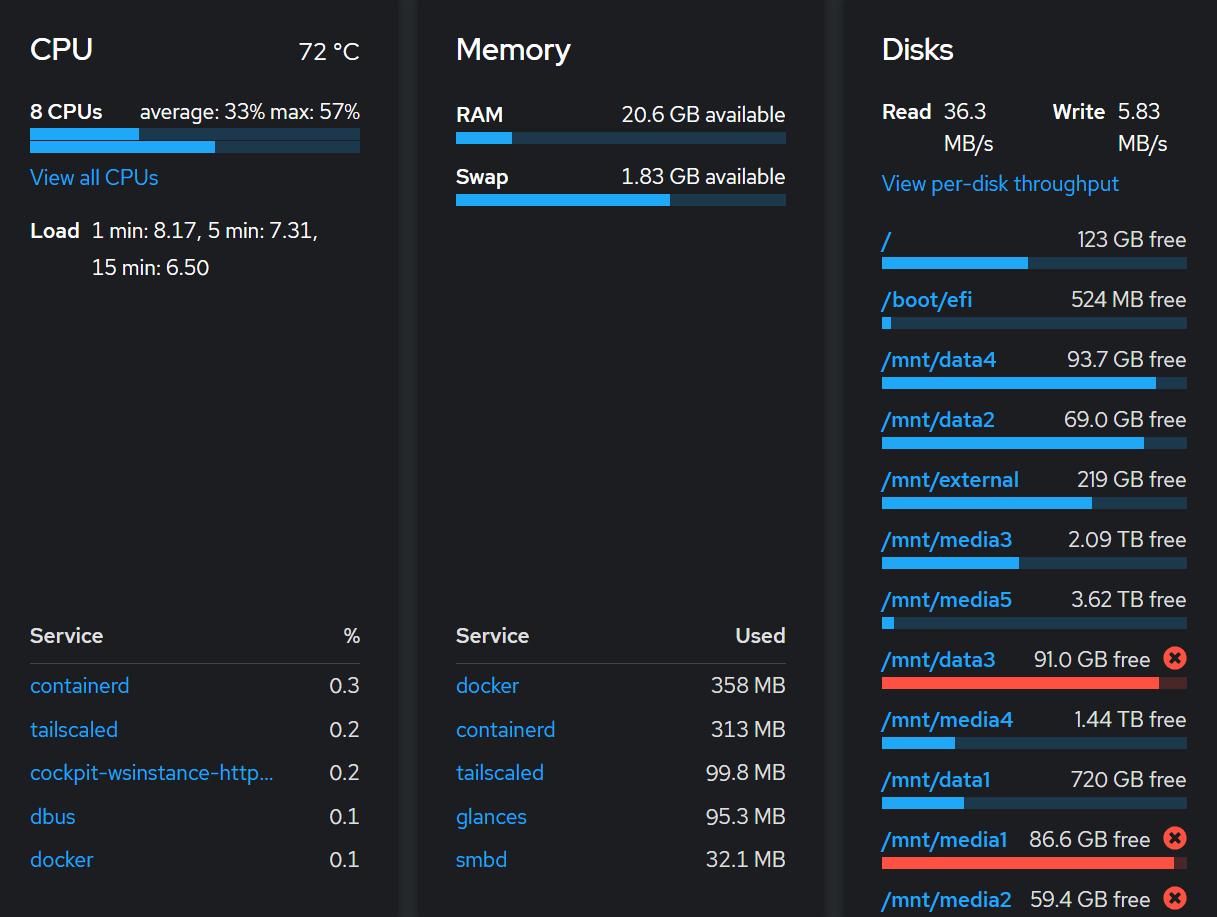
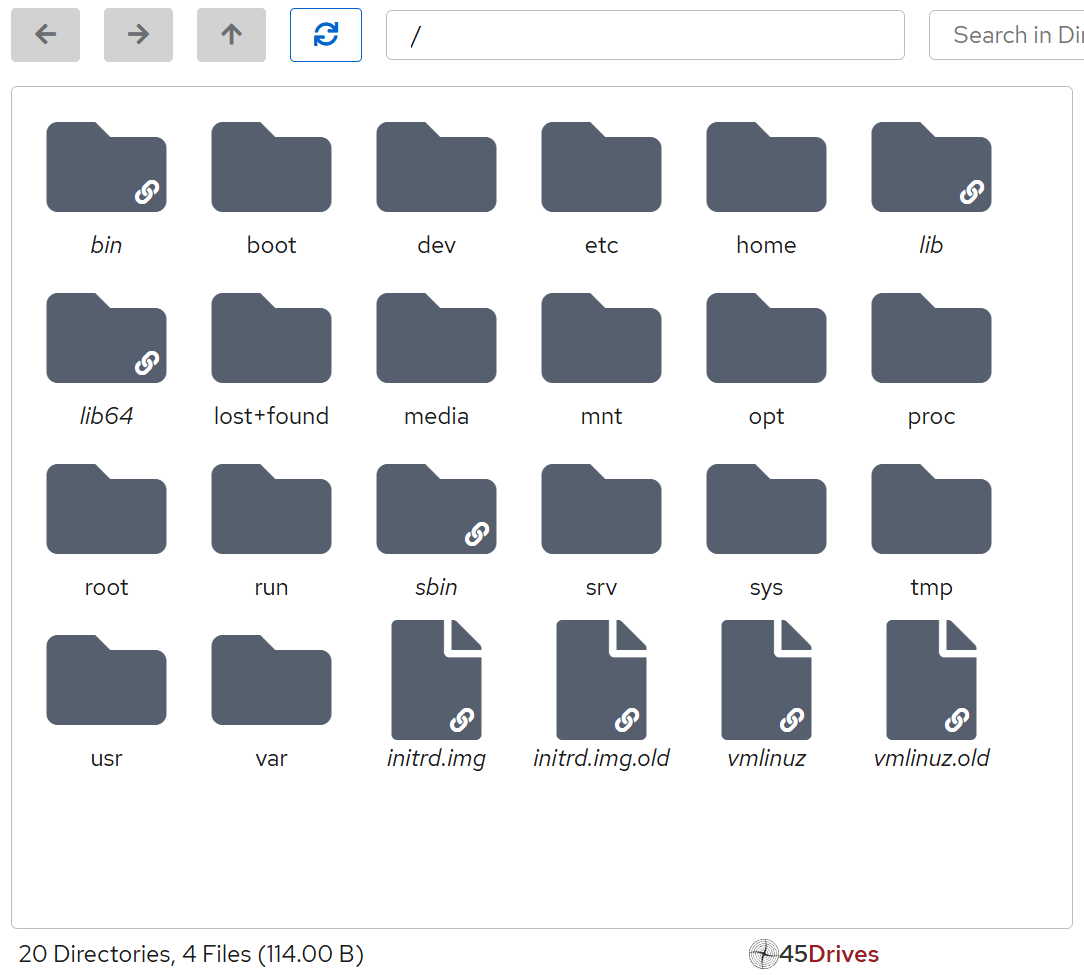
Several hard drives pooled together using MergerFS, with around 10 TB dedicated exclusively to movies and TV shows, while another 6 TB is for other data. For secure remote access to my server and all it’s services (plus everything else on my home network), I have settled on Tailscale for it’s ease of use and exceptionally good free tier. (I wrote a detailed post about Tailscale here.) To manage the server with a nice GUI, I use Cockpit. You can add “applications” for visualizing performance metrics, managing storage, and configuring virtual machines. (Which I rarely use.) I also use the Cockpit add-ons File Sharing to manage my SMB shares and Navigator for a graphical file manager.
Docker containers
Aside from the ones mentioned above, most of my other self-hosted apps and services are run as Docker containers. I’ve run Plex and many other things for years with Docker and I see no reason to stop any time soon. Docker can be installed quickly and with minimal hassle by using their official install script:
curl -fsSL get.docker.com | sudo sh
I’ll devote a section to each docker container I run and include a compose.yaml snippet.
Dozzle
Dozzle is a container log viewer. Portainer shows logs as well, and while it’s useful for “live” logging I find Dozzle’s UX much better for deep analysis of past logs.
dozzle:
 restart: unless-stopped
 container_name: dozzle
 image: amir20/dozzle:latest
 volumes:
  - /var/run/docker.sock:/var/run/docker.sock
 ports:
  - 20080:8080
FileBrowser Quantum
FileBrowser Quantum is a slick web-based graphical file explorer accessed via browser. I rarely use it, but I have it setup to serve my /home directory in case I ever need to access it from another device.
filebrowser:
 image: gtstef/filebrowser
 container_name: filebrowser
 environment:
  - PUID=1000
  - PGID=1000
 volumes:
  - /home/ariel:/srv
  - /opt/docker/filebrowser/filebrowser.db:/database/filebrowser.db
  - /opt/docker/filebrowser/settings.json:/config/settings.json
 ports:
  - 18888:80
 restart: unless-stopped
Gluetun
Gluetun is a VPN client inside a docker container, it can connect to almost any VPN provider, using either OpenVPN or WireGuard protocols. By hooking up another container’s networking to Gluetun, that other container will connect through the VPN. I use qBittorrent with Gluetun for private torrent downloads, that way I don’t expose my IP address and avoid angry letters from my ISP.
gluetun:
 image: qmcgaw/gluetun
 container_name: gluetun
 network_mode: bridge
 cap_add:
  - NET_ADMIN
 devices:
  - /dev/net/tun:/dev/net/tun
 ports:
  - 8080:8080/tcp # qBittorrent
  - 8888:8888/tcp # HTTP proxy
  - 8388:8388/tcp # Shadowsocks
  - 8388:8388/udp # Shadowsocks
  - 58279:58279/tcp # Virtual port forwarding
  - 58279:58279/udp # Virtual port forwarding
 volumes:
  - /opt/docker/gluetun:/gluetun
 restart: unless-stopped
 environment:
  - TZ=America/New_York
  - UPDATER_PERIOD=24h
  - SERVER_COUNTRIES="United States"
  - SERVER_CITIES=Miami,Atlanta Georgia,Chicago Illinois,Dallas Texas,Denver Colorado,New York City
  - VPN_TYPE=wireguard
  - VPN_SERVICE_PROVIDER=airvpn
  - FIREWALL_VPN_INPUT_PORTS=58279
  - WIREGUARD_PRIVATE_KEY=
  - WIREGUARD_PRESHARED_KEY=
  - WIREGUARD_ADDRESSES=
Home Assistant
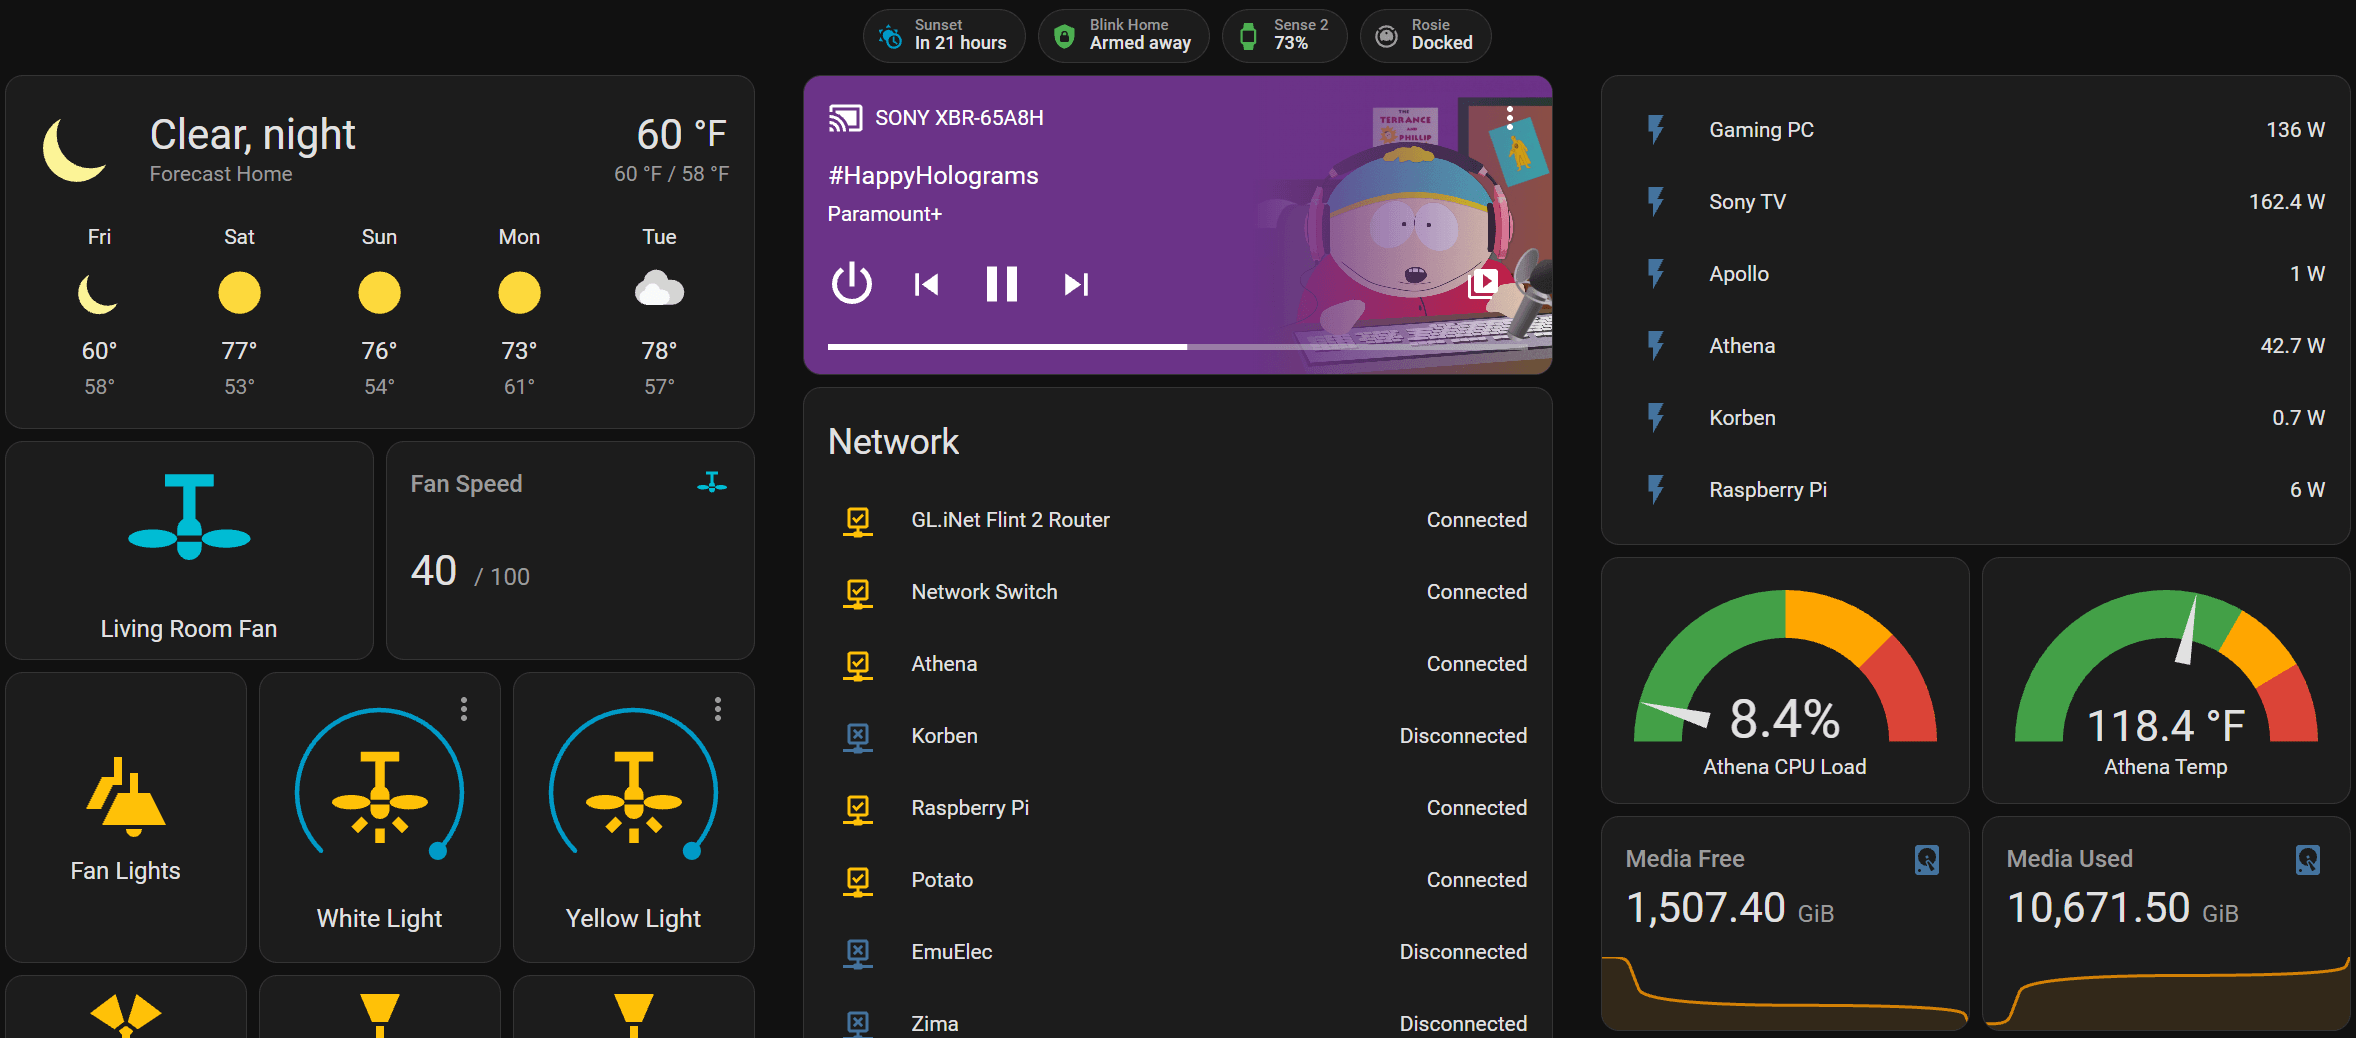
Home Assistant is a smart home automation hub that provides local control over IoT and smart devices in my house. Although I use Google Home on the regular because it’s easier to just speak what I want to do, everything that I can also connect to Home Assistant, I do. It has let me keep controlling my lights a few times when my internet was out, so that alone makes it worthwhile, and creating “if this then that” automations are as useful as they are fun.
homeassistant:
 container_name: homeassistant
 image: ghcr.io/home-assistant/home-assistant:stable
 volumes:
  - /opt/docker/homeassistant:/config
  - /srv/media:/media
  - /srv/data:/data
  - /etc/localtime:/etc/localtime:ro
  - /run/dbus:/run/dbus:ro
  - /var/run/docker.sock:/var/run/docker.sock
 restart: unless-stopped
 privileged: true
 network_mode: host
Kavita
Kavita is a simple user friendly ebook manager and reader, which I’ve been using to read my last few books on either my phone or tablet. It has a really nice and user friendly web GUI.
kavita:
 restart: unless-stopped
 image: jvmilazz0/kavita:latest
 container_name: kavita
 ports:
  - 5000:5000
 volumes:
  - /srv/data/ebooks/comics:/comics
  - /srv/data/ebooks/books:/books
  - /opt/docker/kavita:/kavita/config
 environment:
  - TZ=America/New_York
Nginx Proxy Manager
Nginx Proxy Manager is nice GUI wrapper over Nginx that lets you easily add proxy hosts and redirects, configure TLS, etc. I use it as a reverse proxy to access container web UIs with HTTPS via a custom domain. I use AdGuard Home as my home network DNS, so I have DNS rewrites configured for all the proxy hosts, and a custom domain from Cloudflare gets TLS certificates via DNS challenge.
For details see this blog post about setting up Nginx Proxy Manager with AdGuard Home and Cloudflare.
OpenGist
OpenGist is a self-hosted open source alternative to GitHub Gists. This is only accessible to me and I use it to save like API keys or tokens, configuration files, and code snippets so I can quickly copy & paste these things when I need to.
opengist:
 image: ghcr.io/thomiceli/opengist:1
 container_name: opengist
 restart: unless-stopped
 environment:
  UID: 1000
  GID: 1000
 ports:
  - 6157:6157
  - 2222:2222
 volumes:
  - /opt/docker/opengist:/opengist
Paperless-ngx
Paperless-ngx is a document management system that can index and organize documents, performing OCR to make them searchable and selectable, and saving them as PDFs. If you have a lot of papers you want to digitize and organize, Paperless is a powerful tool for that. You can designate a consume folder and any documents dropped in there will automatically be processed by Paperless.
My wife and I have fed all our tax returns, property documents, medical claims, invoices and receipts to it so that we can just go to a web page with a nice UI from any device to view, edit and print documents. I have an SMB share that points to the consume folder, so anything placed in there (including directly from the scanner) is processed into Paperless.
Paperless runs as three containers, so I put them all in a stack.
services:
 broker:
  container_name: paperless-broker
  image: docker.io/library/redis:8
  restart: unless-stopped
  volumes:
   - /home/ariel/docker/paperless/redis:/data

 db:
  container_name: paperless-db
  image: docker.io/library/postgres:18
  restart: unless-stopped
  volumes:
   - /home/ariel/docker/paperless/postgresql:/var/lib/postgresql
  environment:
   POSTGRES_DB: paperless
   POSTGRES_USER: paperless
   POSTGRES_PASSWORD: paperless

 webserver:
  container_name: paperless-web
  image: ghcr.io/paperless-ngx/paperless-ngx:latest
  restart: unless-stopped
  depends_on:
   - db
   - broker
  ports:
   - 8008:8000
  volumes:
   - /opt/docker/paperless/data:/usr/src/paperless/data
   - /opt/docker/paperless/media:/usr/src/paperless/media
   - /srv/data/documents:/usr/src/paperless/export
   - /srv/data/paperless:/usr/src/paperless/consume
  environment:
   USERMAP_UID: 1000
   USERMAP_GID: 1000
   PAPERLESS_REDIS: redis://broker:6379
   PAPERLESS_DBHOST: db
   PAPERLESS_TIME_ZONE: America/New_York
Plex
Plex is a slick, feature packed media server and streaming player for self-hosted media. It also has some free movies and TV shows, and live TV channels. It’s not open source, some features are behind a paid subscripton or lifetime pass, and the company hasn’t always made good decisions for its users — but it’s still the best and most user friendly media player for me, my wife and two family members I have shared with.
I have written blog posts about how to self-host Plex as a Docker container and how to use Tailscale and an Oracle free tier VM to share your Plex library to other users.
plex:
 restart: unless-stopped
 container_name: plex
 image: linuxserver/plex:latest
 network_mode: host
 environment:
  - TZ=America/New_York
  - PLEX_UID=1000
  - PLEX_GID=1000
 volumes:
  - /opt/docker/plex:/config
  - /srv/media/movies:/movies
  - /srv/media/tvshows:/tvshows
  - /srv/media/transcode:/transcode
  - /srv/media/music:/music
 devices:
  - /dev/dri:/dev/dri
Portainer
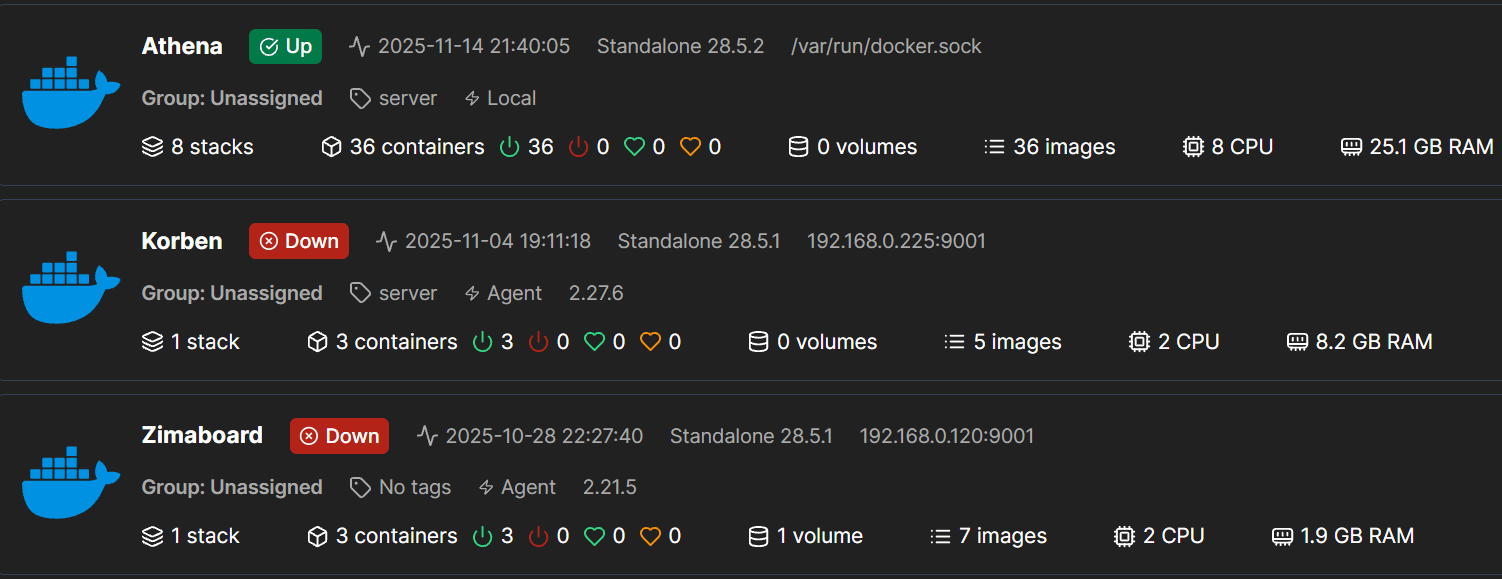
Portainer is always the first container I install on a server that will run Docker. It is a GUI for creating and managing containers, I use the Stacks feature to create different groups of containers with docker compose. I have copies of all my compose files (with secrets removed) saved on GitHub. It’s possible to setup Portainer to pull compose.yaml files from a GitHub repo for setting up Stacks, after which updates in GitHub will be pulled into Portainer, but I have not set this up myself. (I think I just prefer to do it manually in Portainer.)
Thanks to Portainer’s 3 node free license I also use Portainer Agent, connected via Tailscale, to manage another set of remote containers running on an Oracle free tier instance.
Portainer is usually deployed with docker run rather than compose, it’s just a quick command to get started. (Note that I use a bind mount rather than a standard volume for Portainer data.)
docker run -d -p 8000:8000 -p 9000:9000 -p 9443:9443 --name portainer --restart=always -v /var/run/docker.sock:/var/run/docker.sock -v /opt/docker/portainer:/data portainer/portainer-ce:lts
qBittorrent
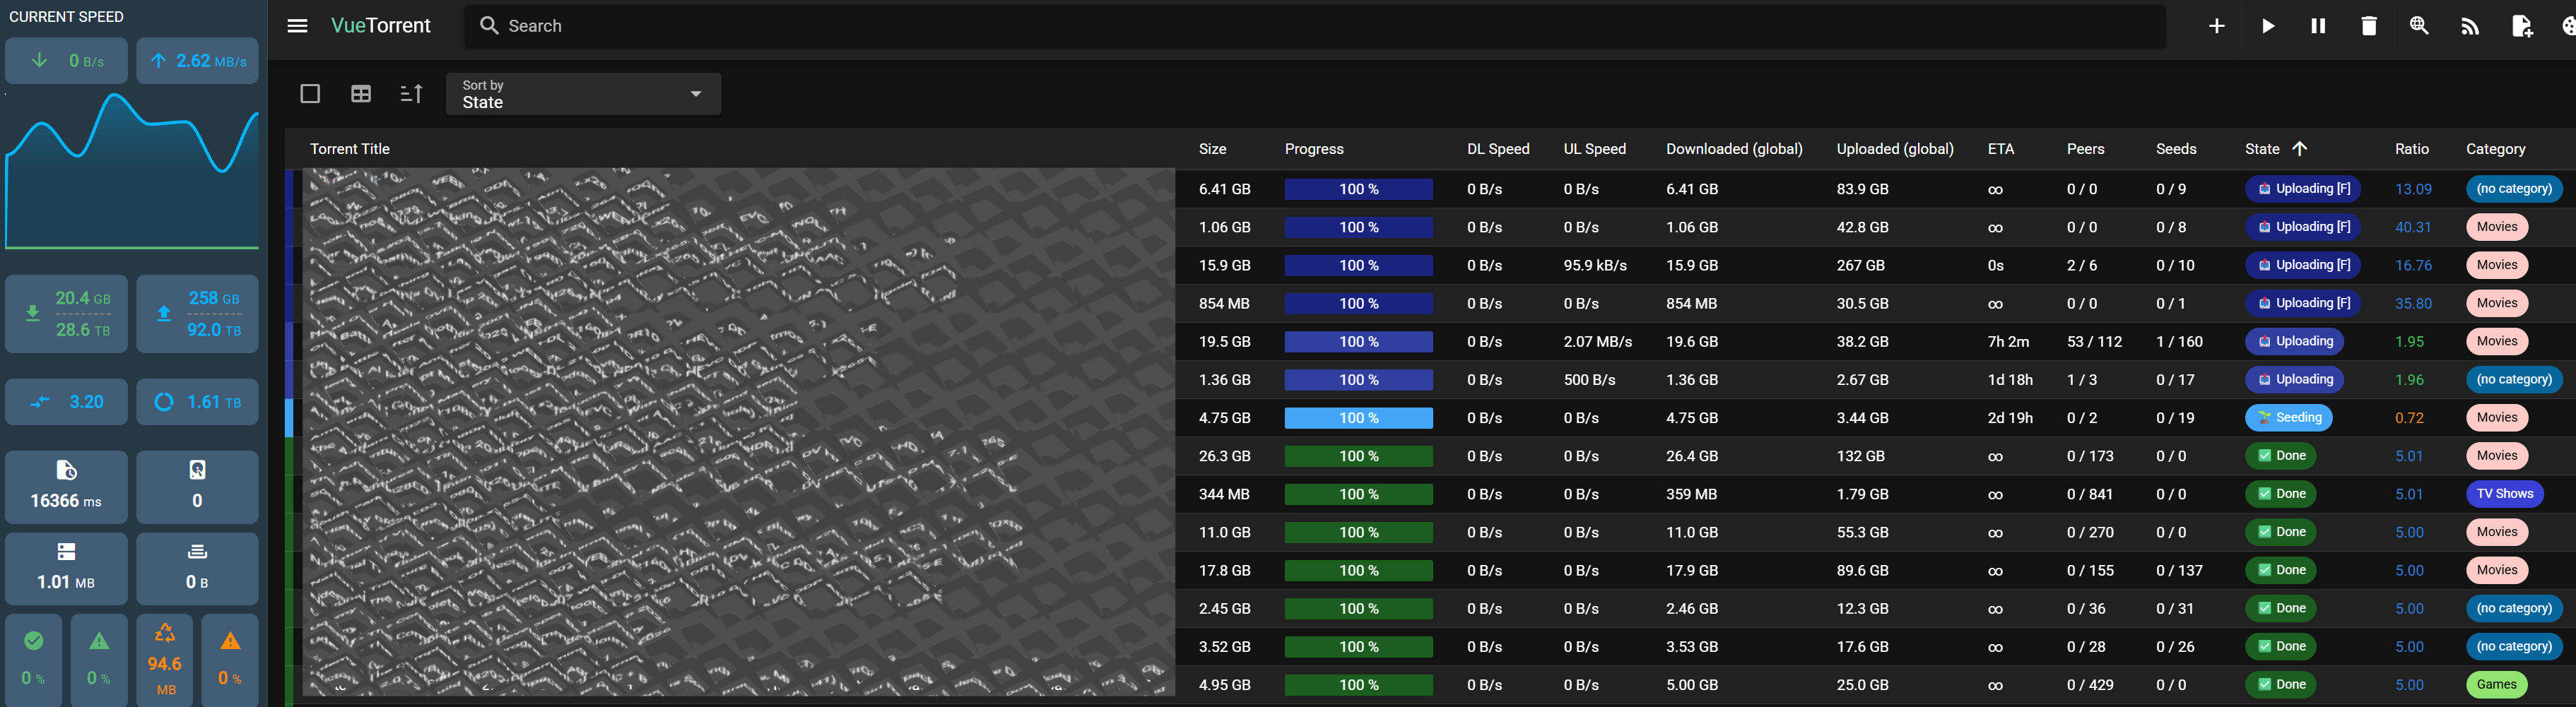
qBittorrent is my preferred torrent downloader, this containerized version makes the GUI accessible from any machine via browser, and it connects to Gluetun so that so all my downloads are routed through my VPN provider. Rather than using the *arr suite for automated downloads, because I just don’t download often enough to bother setting it up, I will manually grab a magnet link from my preferred torrent sites and put it into qBittorrent. I have storage paths configured by categories so that I can just choose “Movies”, “TV Shows” or “Music” categories for each download, and it will be stored in the corresponding path where it is streamable from Plex. I also use the VueTorrent mod for an improved UI.
qbittorrent:
 image: lscr.io/linuxserver/qbittorrent:latest
 container_name: qbittorrent
 environment:
  - PUID=1000
  - PGID=1000
  - TZ=America/New_York
  - WEBUI_PORT=8080
  - DOCKER_MODS=ghcr.io/vuetorrent/vuetorrent-lsio-mod:latest
 volumes:
  - /opt/docker/qbittorrent:/config
  - /srv/media/downloads:/downloads
  - /srv/media/movies:/movies
  - /srv/media/tvshows:/tvshows
  - /srv/media/music:/music
 network_mode: 'service:gluetun'
 restart: unless-stopped
 depends_on:
  gluetun:
  condition: service_healthy
Scrutiny
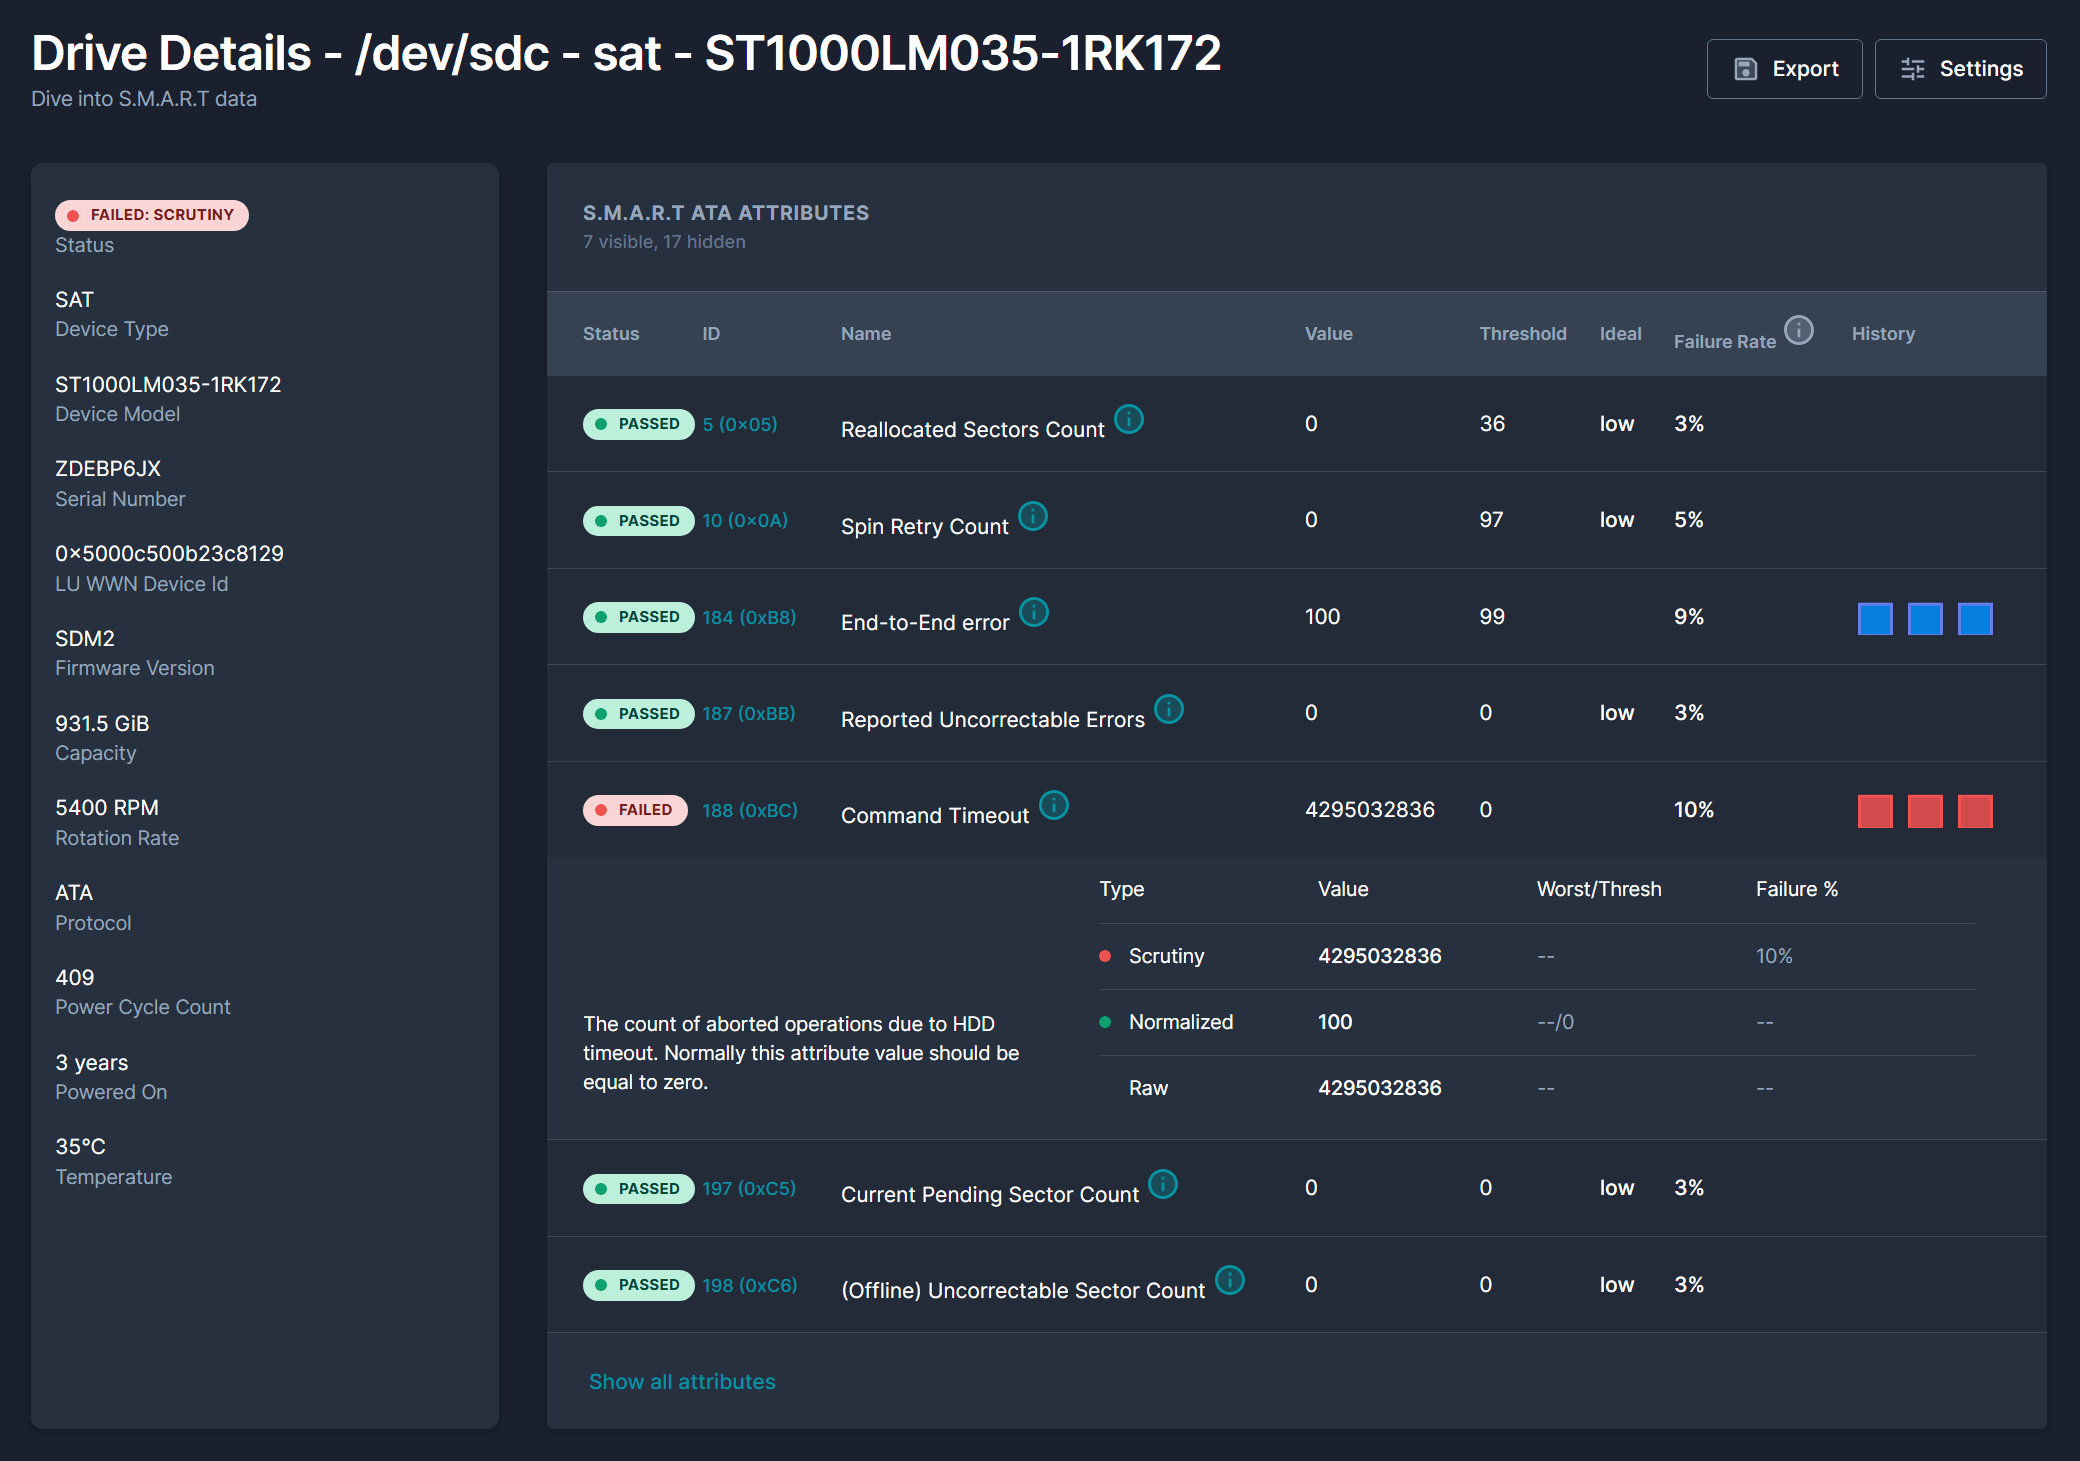
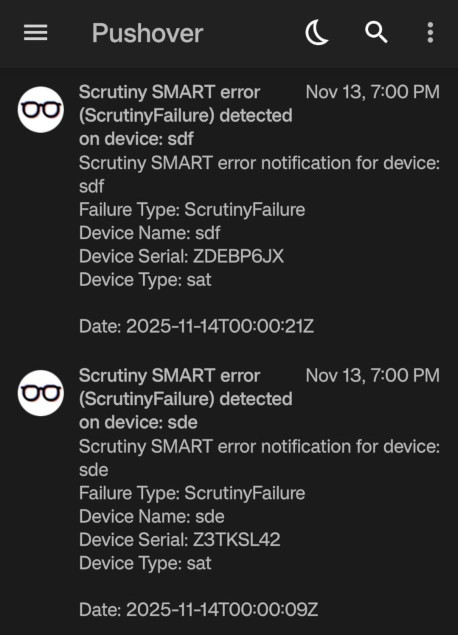
Scrutiny provides a nice dashboard for hard drive S.M.A.R.T. monitoring. I have 10 hard drives on my server of various manufacturers, storage capacities and age so I use this to keep an eye on all of them. (See first screenshot below.) You can also see details on the test results for each drive and decide how severe it is. (See second screenshot, I’m not too worried since it’s not critical and the content of both drives are backed up anyway.) Of course I have Scrutiny setup to send me notifications via Pushover (see third screenshot), but I also have smartd daemon configured to send mail in the server terminal when the tests show critical HDD failure, this already alerted me once to a dying HDD that I was able to replace without data loss.

scrutiny:
 container_name: scrutiny
 image: ghcr.io/analogj/scrutiny:master-omnibus
 restart: unless-stopped
 cap_add:
  - SYS_RAWIO
  - SYS_ADMIN
 ports:
  - '8880:8080' # webapp
  - '8086:8086' # influxDB admin
 volumes:
  - /run/udev:/run/udev:ro
  - /home/ariel/docker/scrutiny:/opt/scrutiny/config
  - /home/ariel/docker/scrutiny/influxdb:/opt/scrutiny/influxdb
 environment:
  SCRUTINY_NOTIFY_URLS: 'pushover://shoutrrr:...@.../'
 devices:
  - '/dev'
Speedtest Tracker
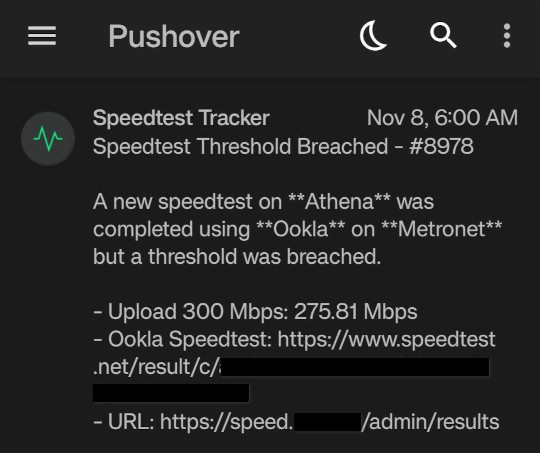
Speedtest-Tracker lets you schedule Ookla speedtests with cron syntax and uses a database to keep a history of test results with pretty graphs. It can also send notifications when a speedtest is completed or if a threshold is met. I use Pushover for push notifications from Speedtest-Tracker to my phone whenever speed results are below 700 Mpbs. (I pay for gigabit fiber, so I like to know how often it’s not actually at those speeds.)
speedtest-tracker:
 image: lscr.io/linuxserver/speedtest-tracker:latest
 container_name: speedtest-tracker
 environment:
  - PUID=1000
  - PGID=1000
  - TZ=America/New_York
  - DB_CONNECTION=sqlite
  - APP_KEY=
  - DISPLAY_TIMEZONE=America/New_York
  - SPEEDTEST_SCHEDULE=0 * * * *
  - PRUNE_RESULTS_OLDER_THAN=30
  - CHART_DATETIME_FORMAT=j M Y, g:i:s
  - APP_URL=
 volumes:
  - /opt/docker/speedtest:/config
 ports:
  - 8800:80
 restart: unless-stopped
Syncthing
Syncthing is used for only one thing, keeping my Obsidian notes synced across PC, phone and tablet. Unfortunately, I’ll have to switch to an alternative eventually since Syncthing for Android has been discontinued. For now I continue using it and it still works. (There’s also Syncthing-Fork as a drop-in replacement for the Android Syncthing app.)
syncthing:
 image: syncthing/syncthing
 container_name: syncthing
 environment:
  - PUID=1000
  - PGID=1000
 volumes:
  - /home/ariel/docker/syncthing:/var/syncthing
  - /srv/data:/data
 network_mode: host
 restart: unless-stopped
Tautulli
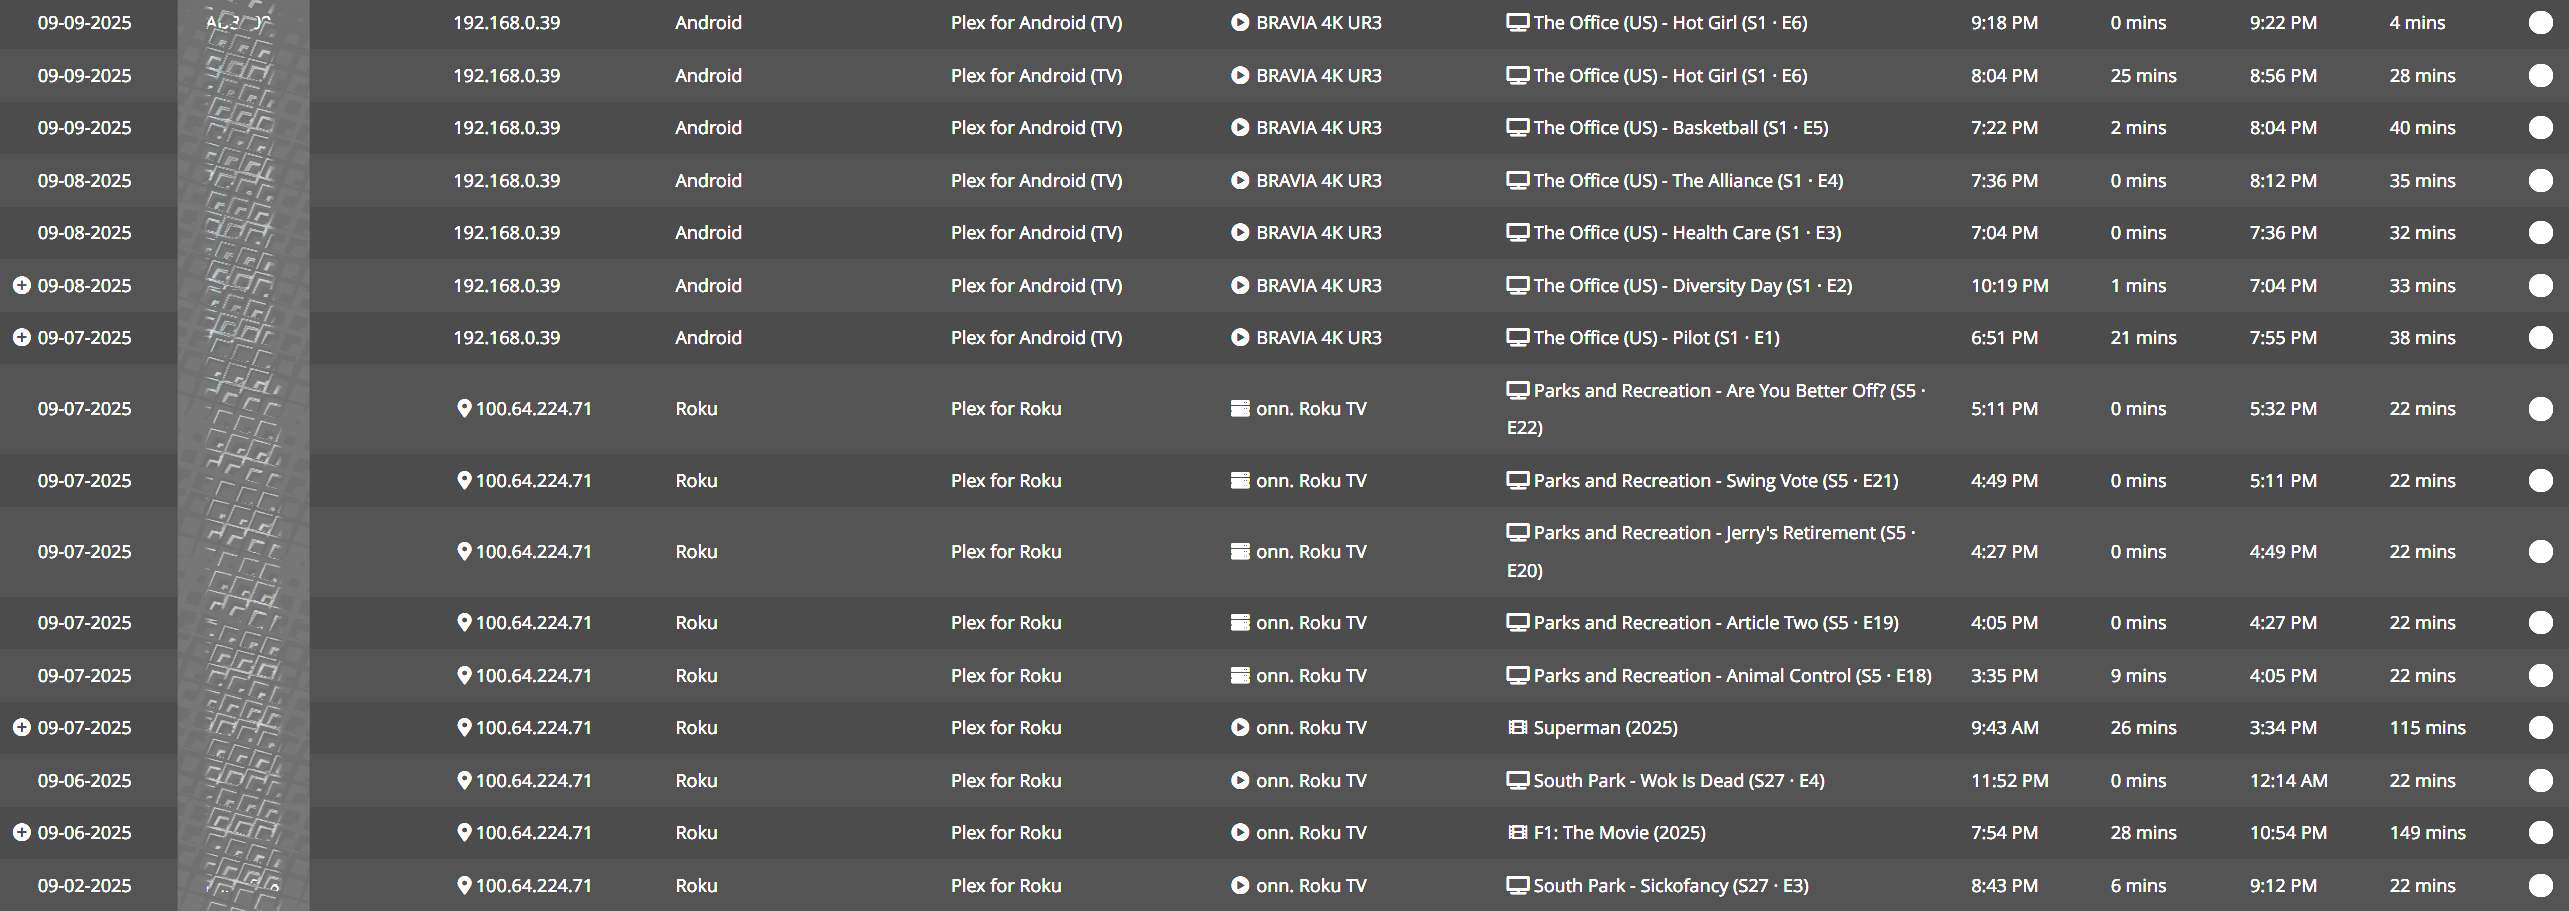
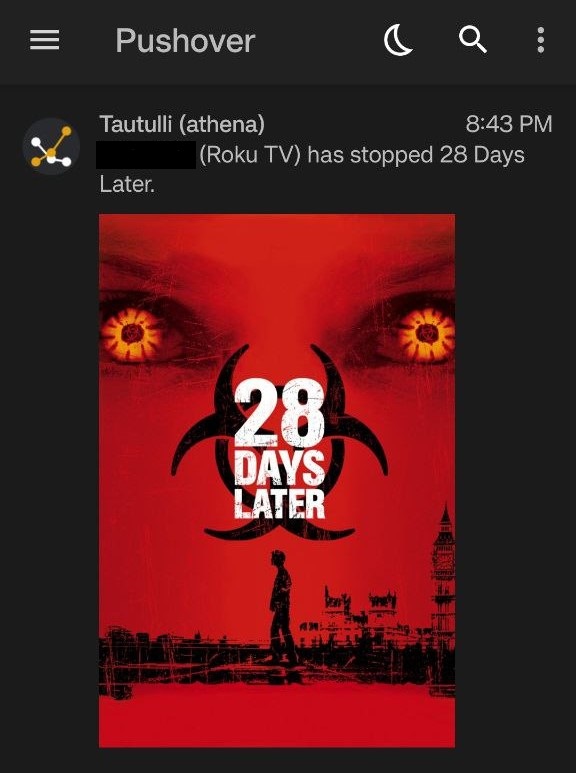
Tautulli runs alongside Plex to provide monitoring and statistics tracking, so I can see a history of what media my users and I consumed, details on when and what device, whether it was direct play or transcode, etc. It also has programmatic notifications with a lot different triggers. Aside from just keeping a comprehensive history of played media, I use Pushover to send push notifications to my phone when other users are playing something on Plex and if they have any stream errors.
tautulli:
 restart: unless-stopped
 image: lscr.io/linuxserver/tautulli:latest
 container_name: tautulli
 ports:
  - 8181:8181
 environment:
  - PUID=1000
  - PGID=1000
  - TZ=America/New_York
 volumes:
  - /opt/docker/tautulli:/config
 depends_on:
  - plex
Uptime Kuma
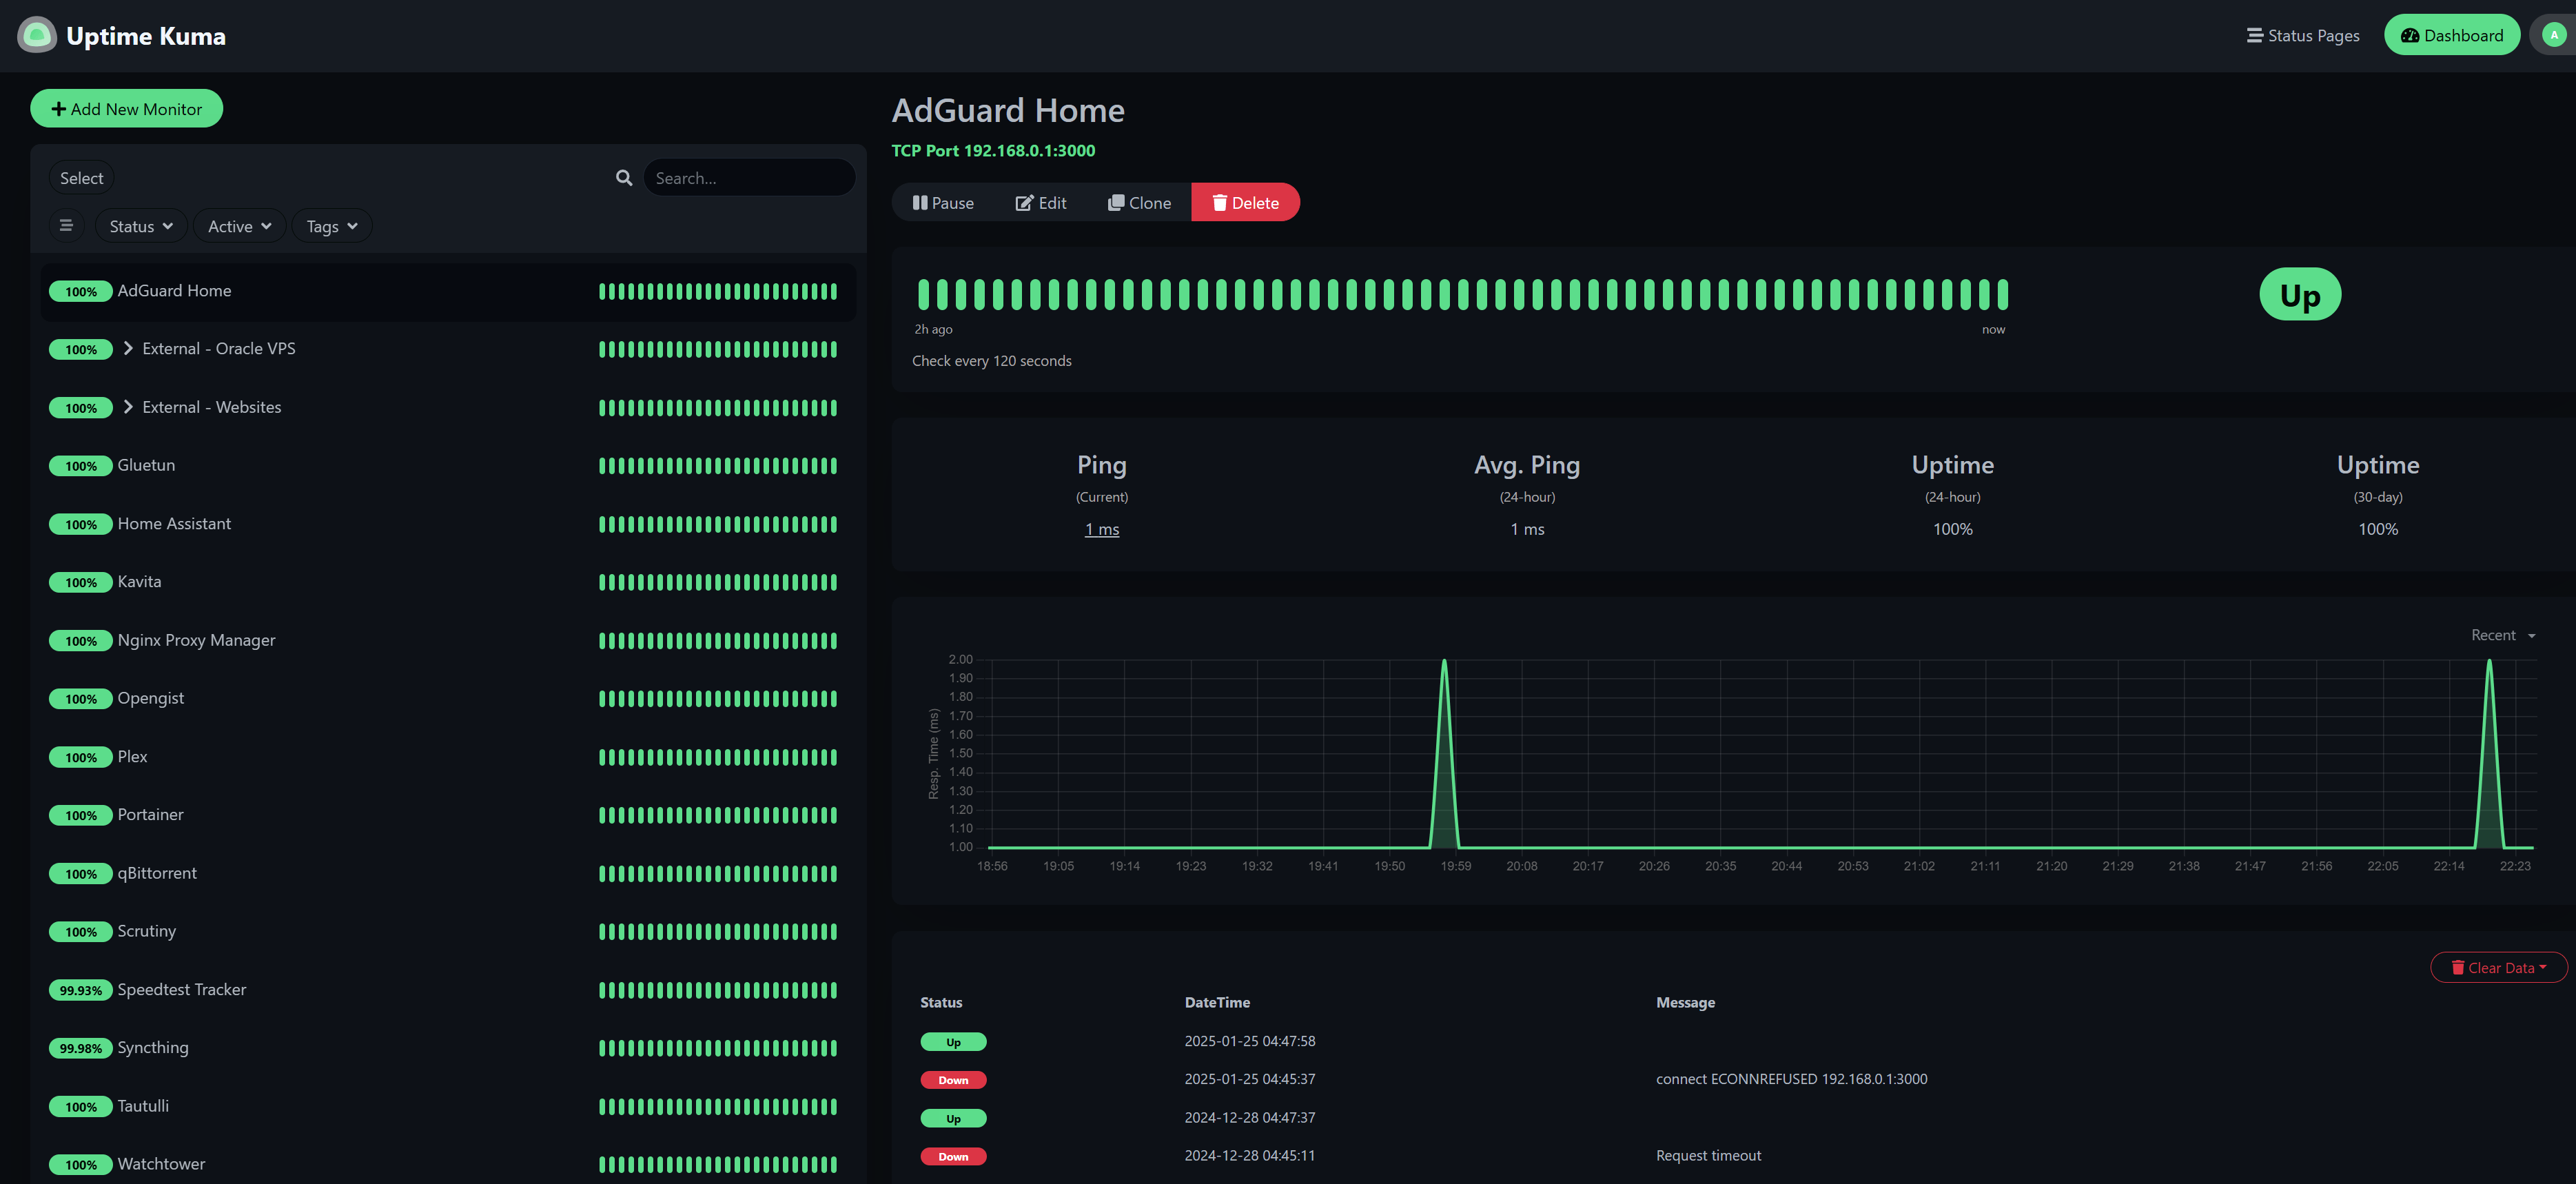
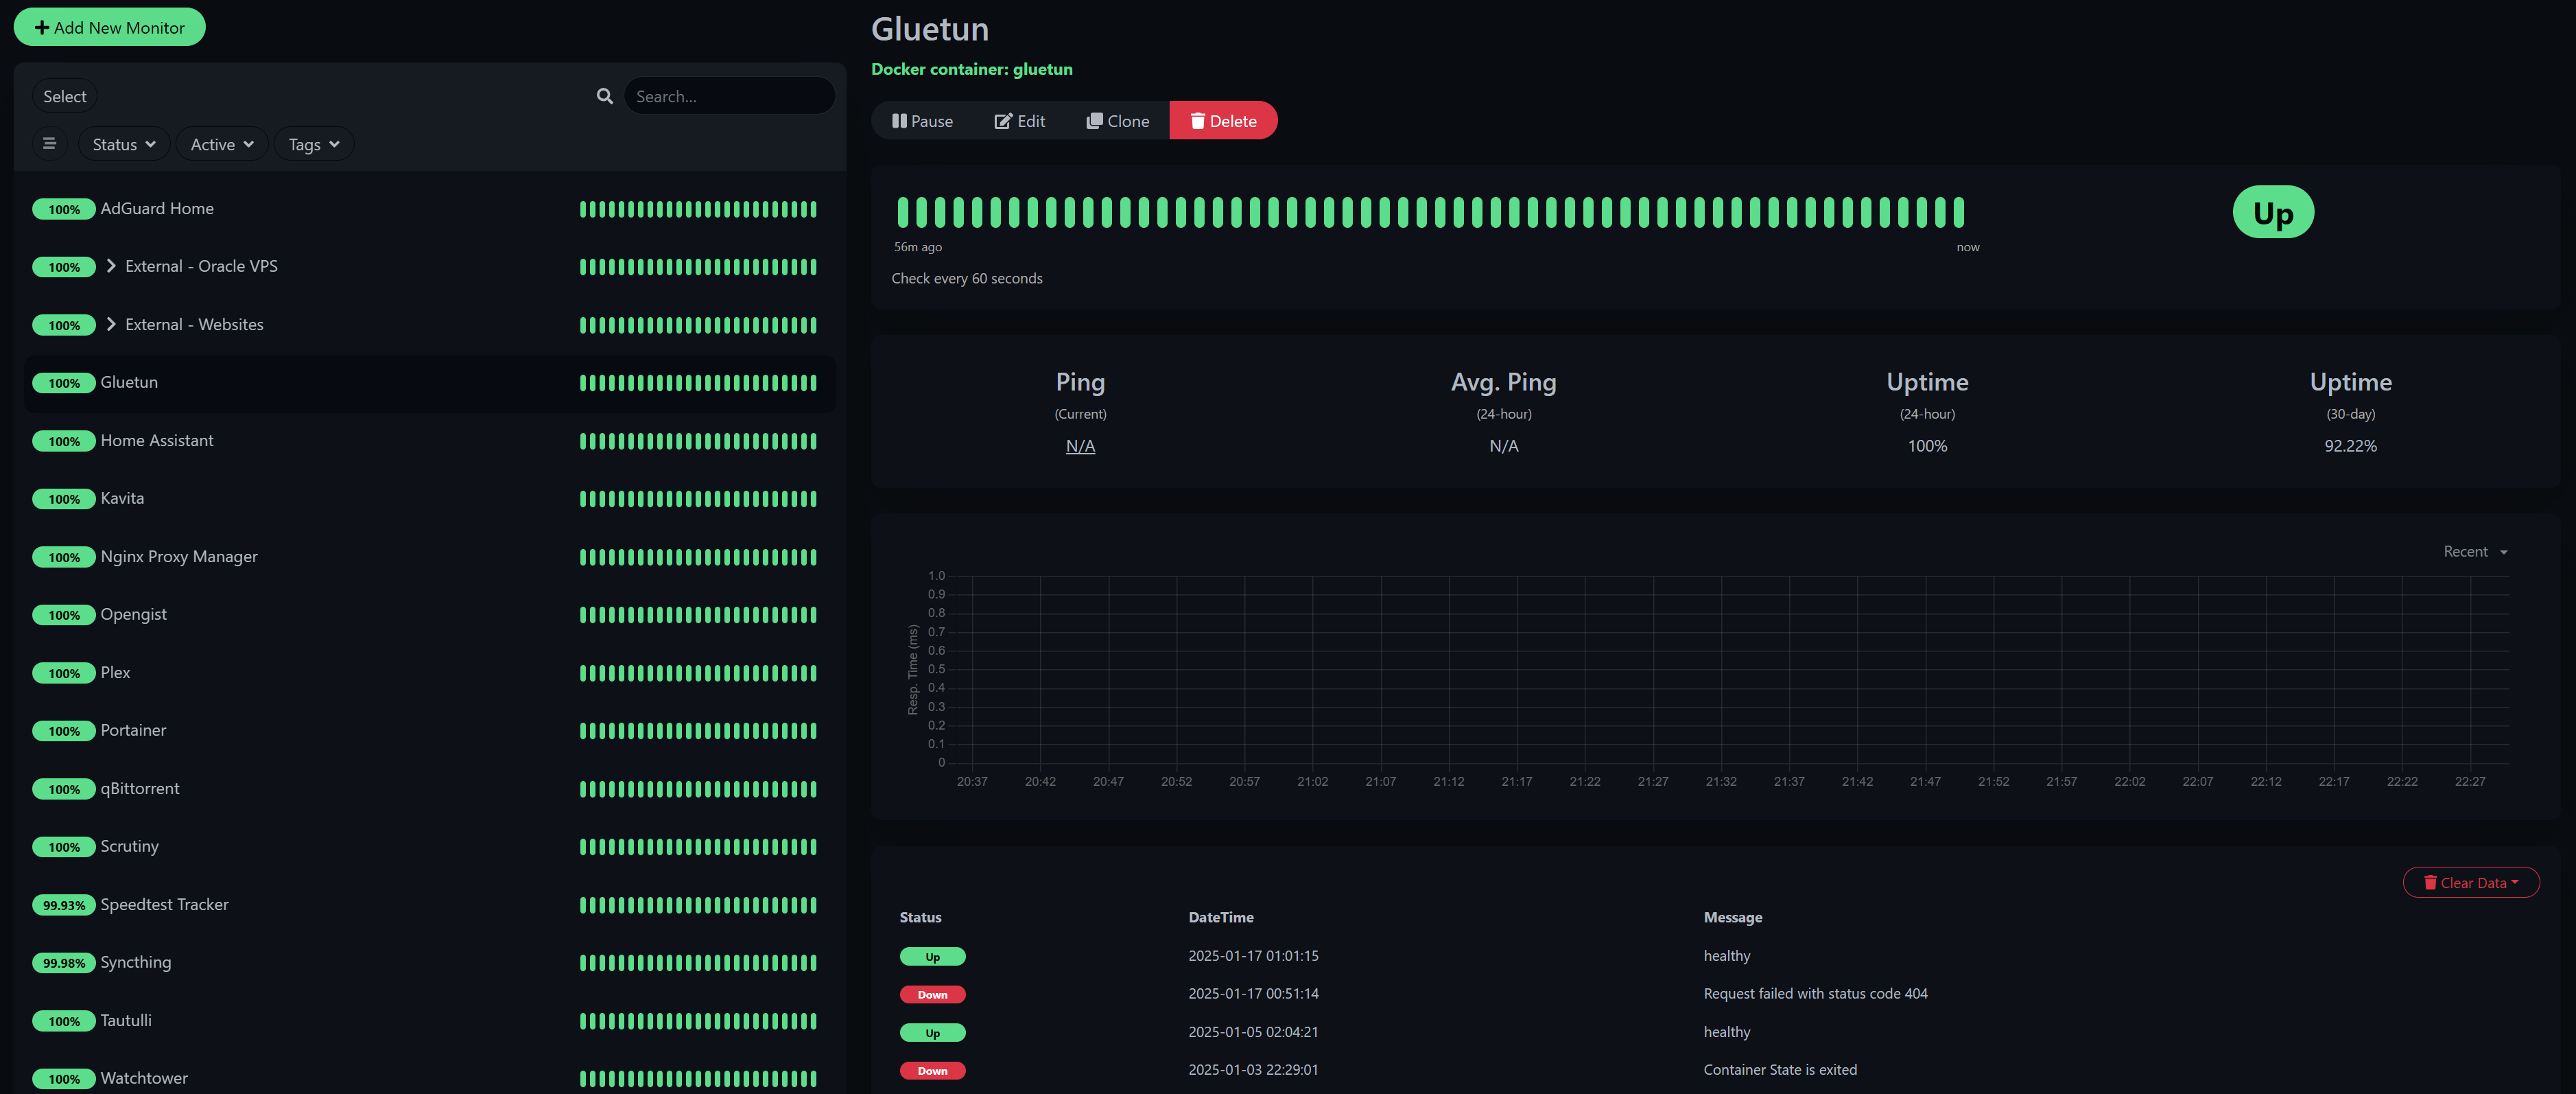
Uptime Kuma is a robust self-hosted uptime monitor, it can keep track of not just uptime of websites, but also Docker containers running on the host or even remotely. I mainly use it to monitor my containers and send a push notification to my phone (via Pushover) when they go down and come back up, other than that I track the uptime of websites (including this one) and make sure AdGuard Home is available.
uptime-kuma:
 image: louislam/uptime-kuma:beta
 container_name: uptime-kuma
 volumes:
  - /opt/docker/uptime:/app/data
  - /var/run/docker.sock:/var/run/docker.sock
 ports:
  - 3001:3001
 dns:
  - 1.1.1.1
  - 8.8.8.8
 restart: unless-stopped
Watchtower
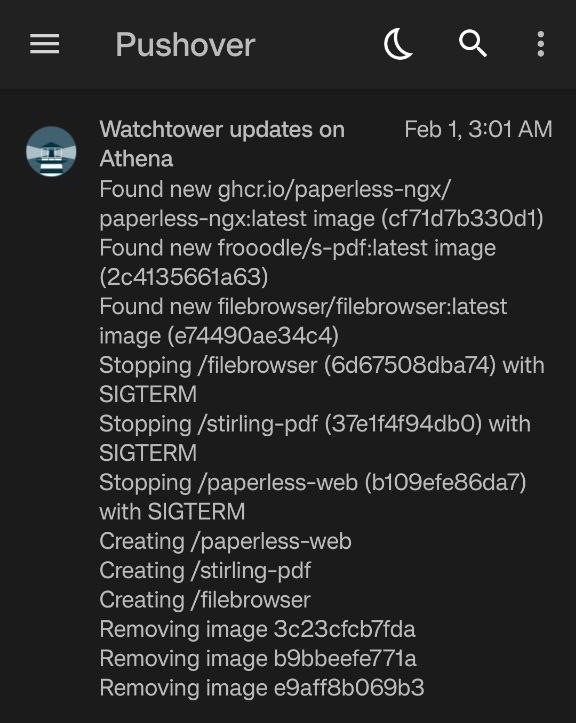
Watchtower keeps track of new version of all your other container images, and (depending on your config) will automatically shut containers down, update the images, prune the old images, and then restart it. You can also schedule your updates for specific dates and times, mine only happen on weekdays at 3 AM. Finally, it can send notifications via many providers, but like with everything else I use Pushover to get notified on my phone when any containers have been updated.
watchtower:
 container_name: watchtower
 image: containrrr/watchtower
 restart: unless-stopped
 environment:
  - WATCHTOWER_NOTIFICATION_URL=pushover://:...@...
  - WATCHTOWER_NOTIFICATIONS_HOSTNAME=
  - WATCHTOWER_CLEANUP=true
  - WATCHTOWER_INCLUDE_STOPPED=true
  - WATCHTOWER_REVIVE_STOPPED=false
  - WATCHTOWER_SCHEDULE=0 0 8 * * *
 volumes:
  - '/var/run/docker.sock:/var/run/docker.sock'
It’s important to note that Watchtower has not been updated in over 2 years and is basically unmaintained at this point. There’s some maintained alternatives, in some cases with even more features, but I personally I have really had a reason to migrate as of yet. If you’re starting out new, I suggest instead checking out What’s Up Docker or Diun
Storage, SMB shares and MergerFS
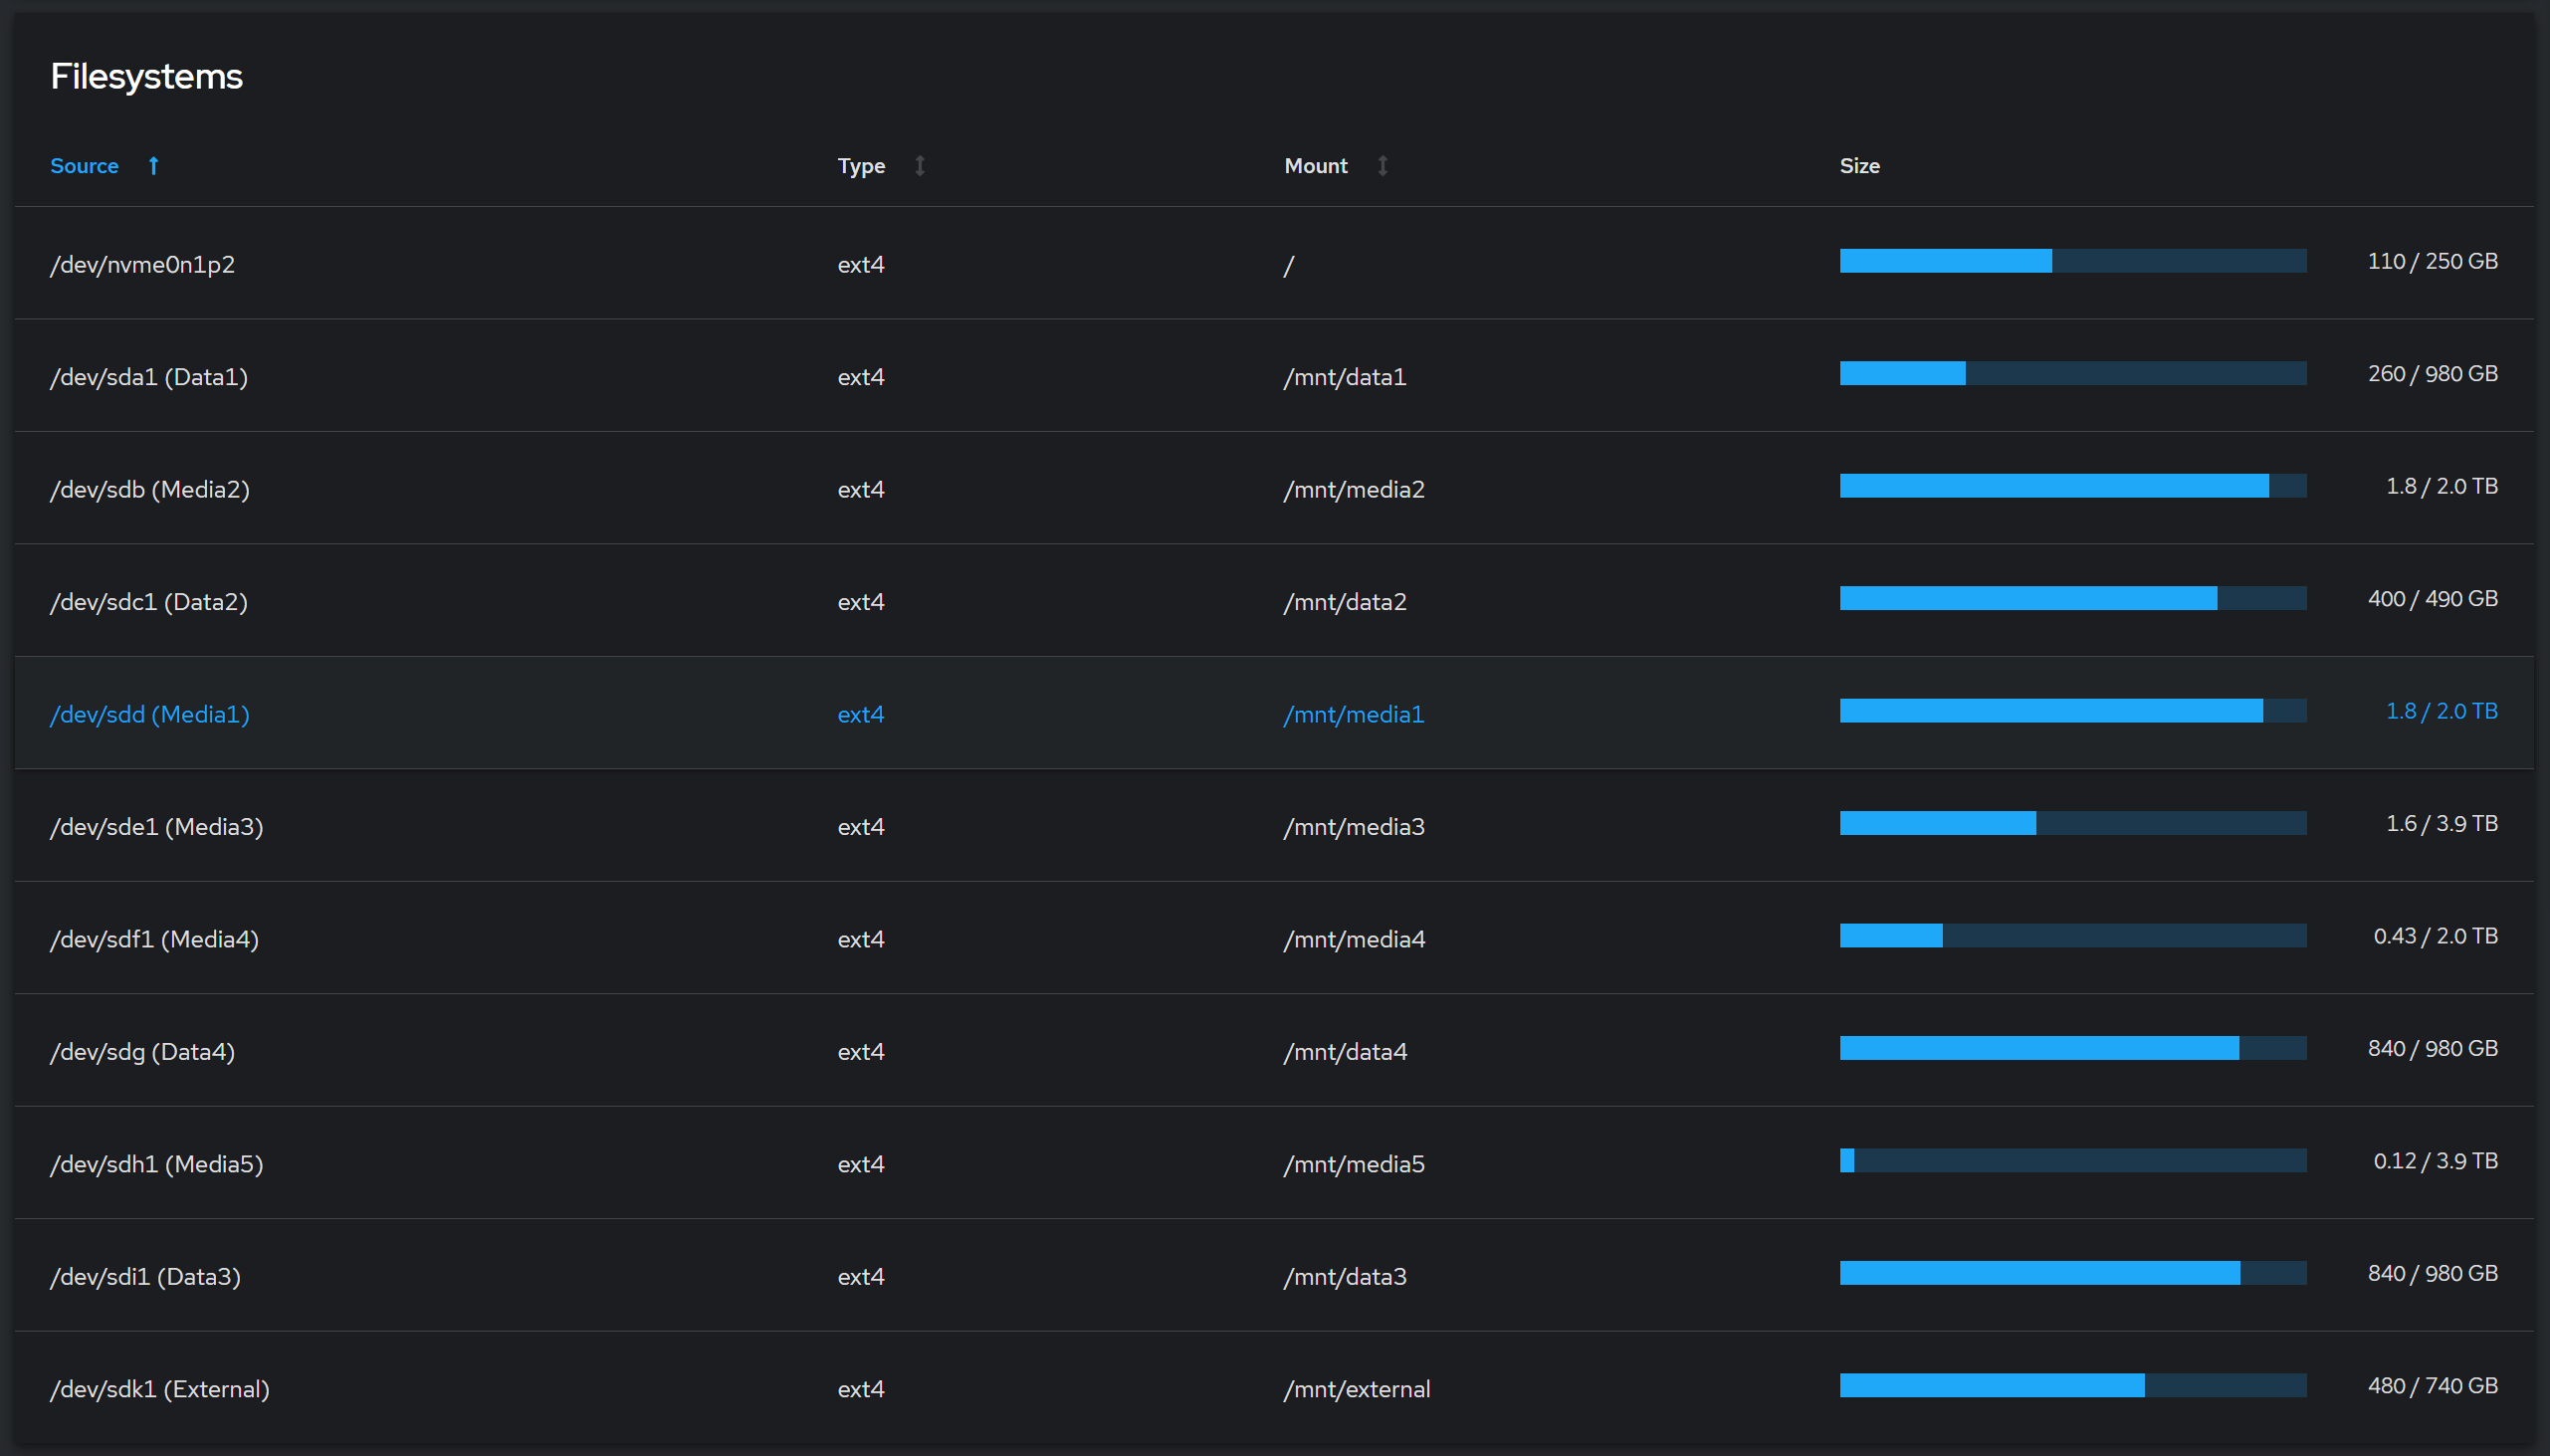
The following storage is installed in the server:
- 1 x 256 GB NVMe SSD
- 2 x 4 TB Internal HDD
- 3 x 2 TB Internal HDDs
- 3 x 1 TB External HDDs
The 256 GB NVMe SSD is the boot drive where Debian is installed. The 4 TB and 2 TB HDDs are used exclusively for movies and TV shows, and 1 TBs are storage for everything else. (Photos, music, documents, etc.)
I don’t bother zfs or RAID. This is kind of a cardinal sin in self-hosting, but I just don’t care enough if one of my drives die and I lose a bunch of movies and TV shows — I can re-acquire any that I want, and ignore any that I don’t care about anymore. (As it is I’m already very bad at removing media I already watched and don’t intend to watch again.) The photos, music and documents are backed up on cloud storage, other machines and an additional dedicated 1 TB backup drive, not listed above. That’s my 3-2-1.
I use MergerFS to create two unified mount points: 10 TB of internal HDDs in /opt/media, where it’s all available to stream in Plex. The other 3 TB of external HDDs is general storage at /opt/data.
MergerFS is quick and easy to install and configure. First, check for the latest version on GitHub and download it:
# latest version when I wrote this
wget https://github.com/trapexit/mergerfs/releases/download/2.40.2/mergerfs_2.40.2.debian-bookworm_amd64.deb
Then install it:
dpkg -i mergerfs_2.40.2.debian-bookworm_amd64.deb
Configuration can be done in multiple ways, but my preference is by editing /etc/fstab. Below is the fstab entry I use:
/mnt/media* /opt/media fuse.mergerfs
defaults,allow_other,nonempty,use_ino,moveonenospc=true,dropcacheonclose=true,category.create=mspmfs,fsname=mergerfs 0 0

/mnt/data* /opt/data fuse.mergerfs
defaults,allow_other,nonempty,use_ino,moveonenospc=true,dropcacheonclose=true,category.create=mspmfs,fsname=mergerfs 0 0
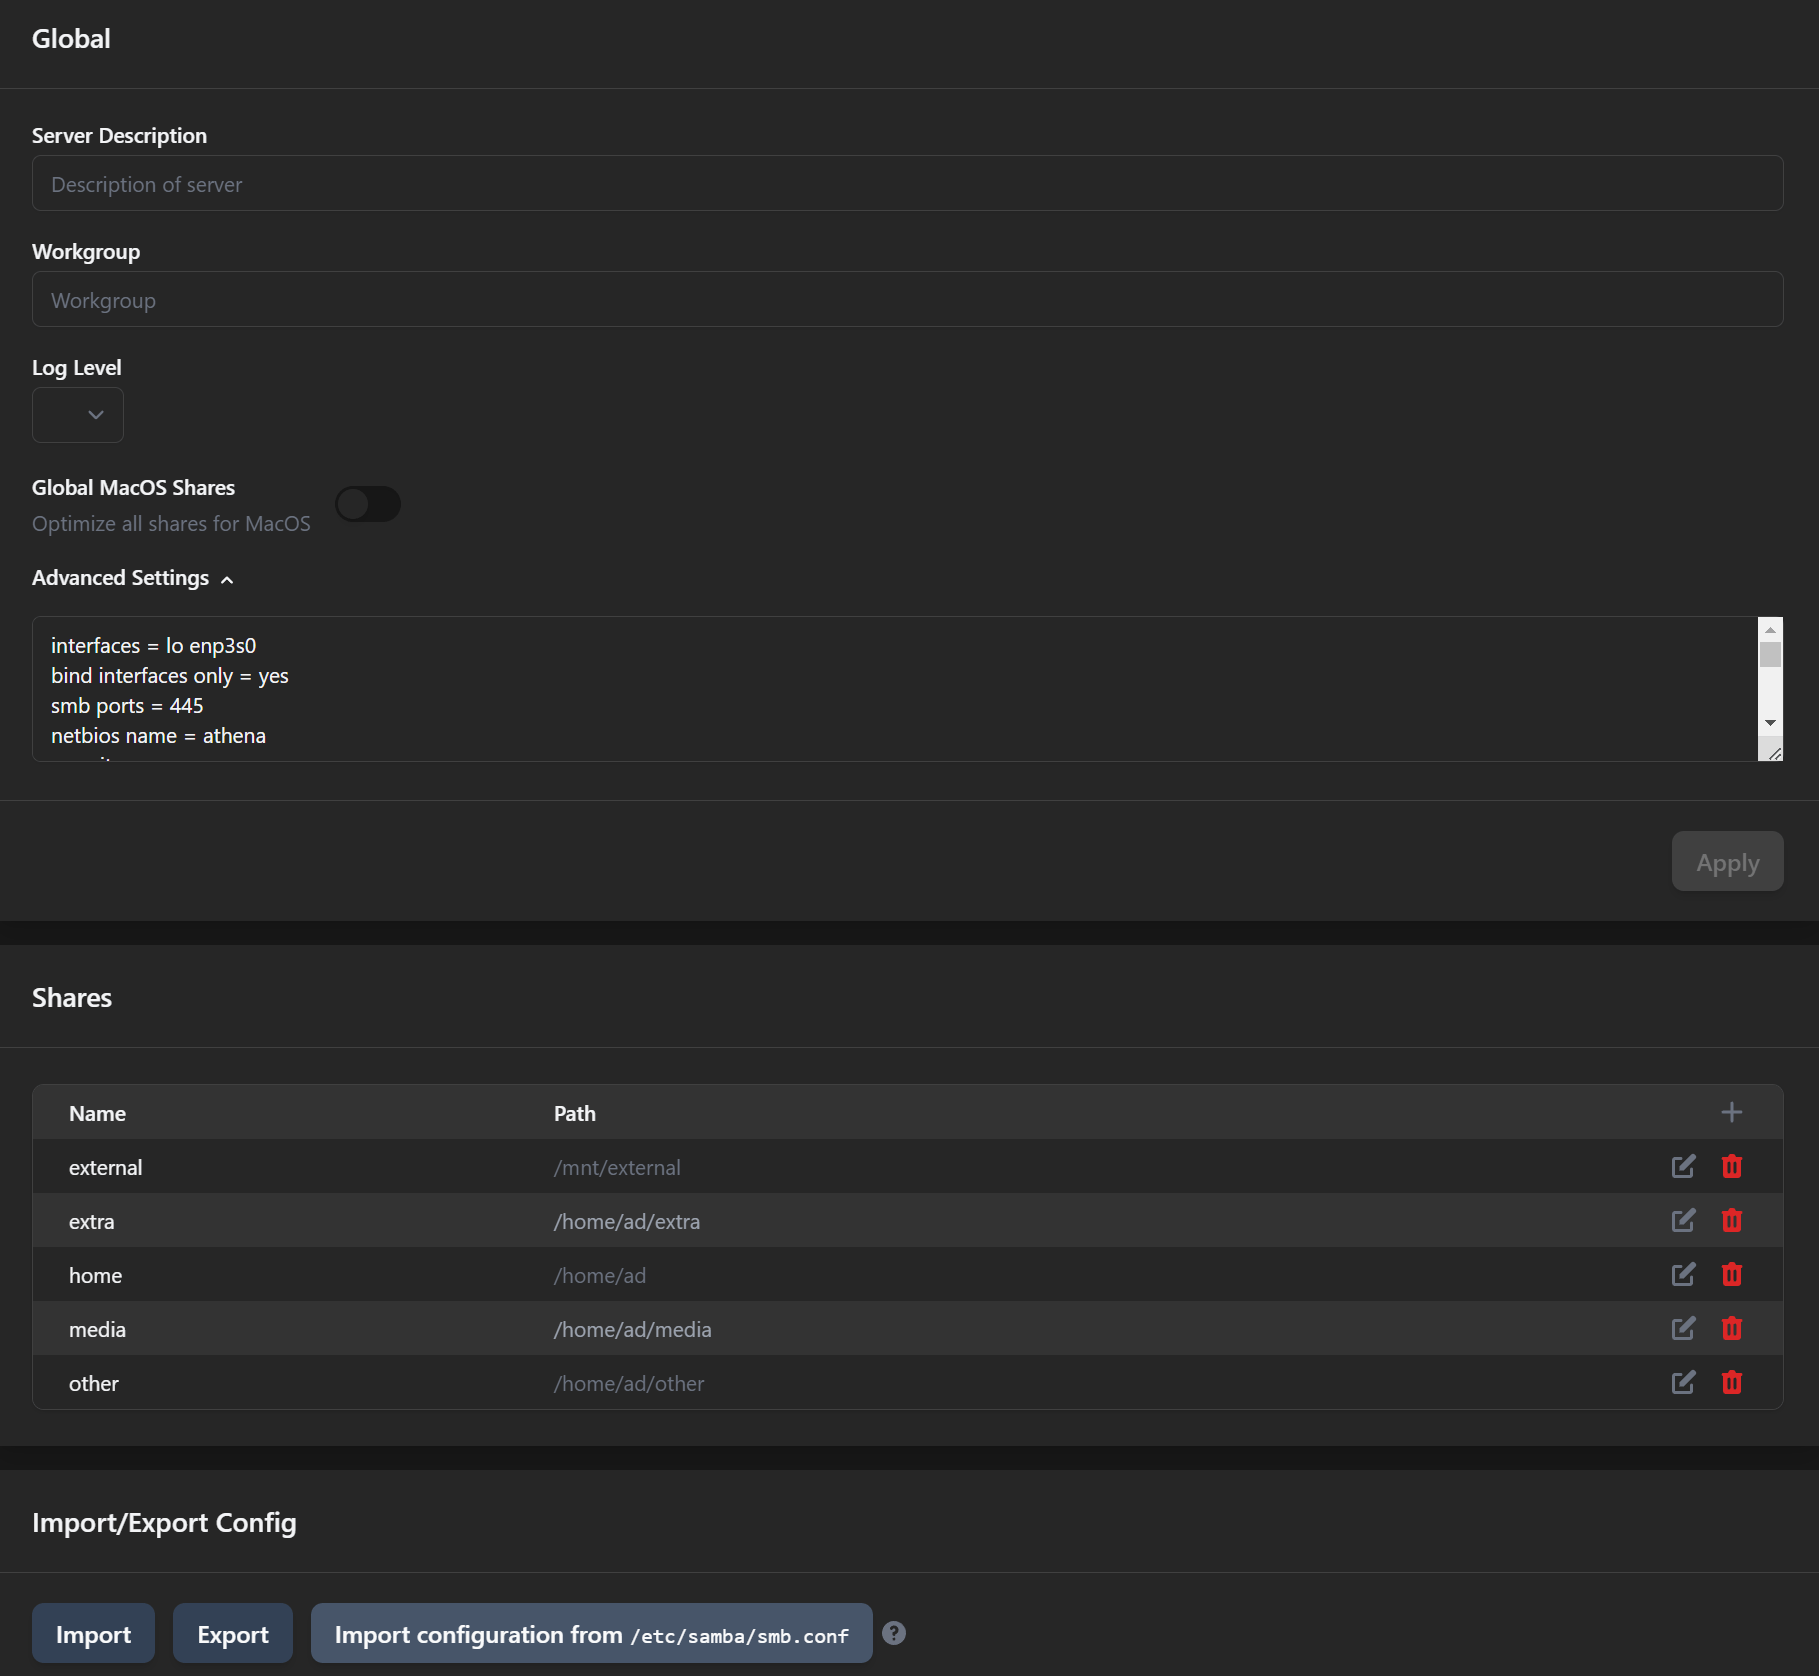
Using SMB, I share the files so they can be accessed from any PC, tablet or phone on the network. (Including via Tailscale.) I also have an SMB share to drop in documents for Paperless to consume. File Sharing is managed via the Cockpit GUI, below is my smb.conf file:
[global]
   interfaces = lo enp3s0
   bind interfaces only = yes
   smb ports = 445
   workgroup = WORKGROUP
   server string = Samba %v %h
   netbios name = athena
   security = user

   log file = /var/log/samba/%m.log
   max log size = 50
   printcap name = /dev/null
   load printers = no

   strict allocate = Yes
   allocation roundup size = 4096
   read raw = Yes
   server signing = No
   write raw = Yes
   strict locking = No
   socket options = TCP_NODELAY IPTOS_LOWDELAY SO_RCVBUF=131072 SO_SNDBUF=131072
   min receivefile size = 16384
   use sendfile = Yes
   aio read size = 16384
   aio write size = 16384

[home]
   comment = Home Directory
   path = /home/ariel
   browseable = yes
   writeable = yes
   read only = no
   force user = ariel
   force group = ariel

[media]
   comment = Media Share
   path = /opt/media
   browseable = yes
   writeable = yes
   read only = no
   force user = ariel
   force group = ariel
   force create mode = 0666
   force directory mode = 0777

[data]
   comment = General Share
   path = /opt/data
   browseable = yes
   writeable = yes
   read only = no
   force user = ariel
   force group = ariel
   force create mode = 0666
   force directory mode = 0777

[external]
   comment = External Backup Share
   path = /mnt/external
   browseable = yes
   writeable = yes
   read only = no
   force user = ariel
   force group = ariel
   force create mode = 0666
   force directory mode = 0777

[paperless]
   comment = External Backup Share
   path = /opt/data/paperless/consume
   browseable = yes
   writeable = yes
   read only = no
   force user = ariel
   force group = ariel
   force create mode = 0666
   force directory mode = 0777
SMB shares are available on the network for my wife and I to access from any PC or laptop, even any tablet or phone — I wrote blog posts about how to access SMB shares from Android, using Solid Explorer or using Xplorer File Manager. On my Windows PC, I have the SMB shares mapped as network drives and mostly manage them through there.

Tailscale for remote access
My preferred way of remotely accessing my home network is Tailscale. If you don’t know, Tailscale is a mesh virtual private network (VPN) that uses the WireGuard protocal for encrypted peer-to-peer connections. For details on how it works, see here.
Tailscale not the only remote access solution, and technically it is not self-hosted, it’s just the solution I landed on and ended up loving. Creating a Tailscale account also creates a Tailnet. Any machines that run Tailscale are added to the Tailnet as nodes, which you’ll manage through the web-based admin console.
Tailscale is easy to learn and use, and when setup properly is totally secure without port forwarding or exposing anything to the internet. I wrote a blog post with more details on how to set it up. The easiest way to install on a Linux server is to use the Tailscale install script:
curl -fsSL https://tailscale.com/install.sh | sh
By default using most Tailscale commands requires superuser privileges, i.e.
sudo. By using the commandsudo tailscale set --operator=$USER, the specified user will then be able to execute Tailscale commands withoutsudo.
Once installed, Tailscale is run with the following command:
tailscale up
I have both my home server and the separate machine running Pi-Hole as nodes in my Tailnet, along with my phone, tablet and a laptop. The server acts as subnet router so that I can access the entire network via Tailscale, not just the nodes with Tailscale installed. As per the Tailscale documentation on subnets, this is done with the following commands.
First, to enable IP forwarding:
echo 'net.ipv4.ip_forward = 1' | sudo tee -a /etc/sysctl.d/99-tailscale.conf
echo 'net.ipv6.conf.all.forwarding = 1' | sudo tee -a /etc/sysctl.d/99-tailscale.conf
sudo sysctl -p /etc/sysctl.d/99-tailscale.conf
tailsclae
Then to advertise subnet routes:
tailscale up --advertise-routes=192.168.0.0/24
Finally, to make my SMB shares accessible via Tailscale, I use the following command:
tailscale serve --bg --tcp 445 tcp://localhost:445
Now with the Tailscale client installed on my Android phone, and toggling it on as VPN, I can access my home network on the go. I have Pi-Hole running on a Libre Potato that acts as the DNS server for the Tailnet, so I get ariel blocking on the go too.
Other homelab things
Most everything I self-host is on this one server, but I do have some other things going on. I have two free-tier Oracle Cloud Infrastructure E.2 Micro instances that I connect to via Tailscale. One is used to allow secure remote access to Plex by other users, the other runs Pi-Hole as DNS for the entire tailnet, including my phone when I’m not home. (I also have an Ampere A1 Flex Arm-based instance using the resource limits of 4 OCPUs and 24 GB memory, where I test out some stuff.)
I have a ZimaBoard running a local instance of Pi-Hole for my tailnet, but it’s usually off because I prefer to use the free Oracle VM. (I may flash OpenWRT onto the ZimaBoard and turn it into a Tailscale travel router.) In addition I have two Libre Sweet Potato SBCs that used to run my home instances of Pi-Hole, but are just sitting in a drawer unused for now.