How to expose Plex to share your library with others from behind CGNAT using Tailscale and a free Oracle Cloud instance
Updated
I wrote before about sharing my Plex library via Cloudflare Tunnel, but that is technically against their TOS and liable to get your account in trouble. So I switched to using a free-tier Oracle VM, securely connecting it to my home network via Tailscale, and exposing Plex via reverse proxy on the VM. It works like a charm!
Table of Contents
- What and Why
- Pre-Requisites
- Create OCI account
- Create a compute instance
- SSH into instance
- Set up Tailscale
- Configure DNS in Tailscale
- Add and configure domain in Cloudflare
- Install reverse proxy on Oracle instance
- Add ingress rules on OCI
- Add proxy host in Nginx Proxy Manager
- Configure the Plex server
- Using the Plex server as subnet router and exit node
- References
[warning] Important
Effective April 29, 2025 an active Plex Pass subscription is required to remotely access Plex — the below still works as is to get through CGNAT with Plex Pass, however if you are trying to share your library without Plex Pass (or without the user you’re sharing with have a Remote Watch Pass) then additional configuration is required.
I have added a section at the end to setup the Plex server as a subnet router and exit node, which seems to be a workaround to get this to work. Please let me know if this no longer works, since I cannot test it myself as a lifetime Plex Pass owner!
What and Why
Plex is a self-hosted media server that lets you stream your owned (or downloaded, or otherwise acquired) media from other devices on the same network, through a web-based GUI (access via browser) or dedicated app. (Say, on a smart TV or Roku device.) Plex has a built-in feature to share your media library externally, but that requires opening a port on your router and forwarding it to the Plex server. Setting aside that port forwarding can be dangerous if you don’t know what you’re doing, it won’t work anyway if your home network is behind Carrier-Grade Network Address Translation, or CGNAT. Many ISPs use this, and so many self-hosters may find themselves unable to expose their services.
Although I previously wrote about how to expose Plex through CGNAT with Cloudflare Tunnel, it’s against their terms of service, so I don’t use that method anymore and suggest you don’t either. The method I explain in this post has a few extra steps, but it does not run afoul of any service provider’s rules.
The following is only for exposing Plex to other users you’ve shared libraries with, and is not required for you to remotely access your own Plex server.
For your own remote access through Tailscale, just install it on the Plex server and also on whatever external device(s) you want to access Plex from. A cloud VM or VPS is only necessary to expose Plex to other users without them needing to run Tailscale themselves.
What we’ll be setting up is this:
We will install Tailscale on the same server as Plex or, alternately, on another machine in the home network that will act as subnet router. (See this section Tailscale docs — for this guide, we’ll install Tailscale on the same server running Plex, so subnet routing isn’t necessary.)
We will create a free tier compute instance on Oracle Cloud Insfrastructure and install Tailscale on it, so it’s on the same tailnet as the Plex server. We’ll expose ports 80 and 443 to the internet on the VM, but only allowing access from specific IPs, and run a reverse proxy to route the traffic from allowed IPs to Plex. Note that if you’re willing and able to pay for another cloud service provider, everything besides the Oracle-specific instructions should work there too! If you don’t want to pay, though, just know that I have used a free Oracle instance to share Plex with 3 family members for over a year and so far it’s worked great.
Pre-Requisites
First of all, you should be comfortable using the terminal, because we’ll be doing quite a bit through command line. (Ubuntu specifically, since that’s the distribution I used for OCI from the options available.)
The method I explain here requires you to own a domain — it may be possible to instead use something like DuckDNS or NoIP, but I have not tried it. I’ll also be using Cloudflare for DNS, but that’s just my personal preference — feel free to use another DNS provider.
Finally, you’ll need a Plex server already set up. (And I’ll assume it’s running in Linux or as a Docker container.) I won’t go into how to do that here, see this post for instructions on running Plex as a Docker container.
Create OCI account
We’ll be using a free-tier VM from Oracle Cloud Infrastructure (OCI) — specifically, an E2 Micro instance which runs on a single-core AMD OCPU, has 1 GB of memory and a 0.48 Gbps connection, more than enough for streaming even 4K content through Plex. You can run TWO of these VMs totally free.
In addition to two AMD E2 Micro instances, the OCI free tier includes one Ampere A1 Flex instance with up to 4 Arm OCPUs, up to 24 GB of memory, and a connection of 1 Gbps per OCPU.
These are the total limits across all Ampere instances, you can instead split these resources — for example two instances with 2 OCPUs and 12 GB of memory, or 4 OCPUs with 6 GB of memory each, etc.
[warning] Important
It may be preferable to use the free Ampere A1 Flex instance for this instead of an AMD E2 Micro if you want faster connection for more concurrent remote streams, if sharing your library with more than 1 or 2 users, and especially for stable multiple 4K streams.
However, you will most likely encounter an “out of capacity” error when trying to provision an Ampere A1 Flex, but if you upgrade your free tier account to Pay As You Go, the errors will disappear. I have confirmed this myself by upgrading my account.
Just be sure to stay within the free limits noted above if you do this!
First, go to Oracle Cloud’s website and click Start for free to create your account. You will need a credit card, but only for verification purposes! As long as you stick to free tier and don’t upgrade, you won’t be charged.
Once your account is set up you’ll receive an email with the Cloud Account Name (which is your “tenant”) and Username. (The email you used to sign up.) You’ll need the Cloud Account Name to sign-in to OCI, after which you’ll be asked for the email address and password.
You’ll be asked if you want to Enable Secure Verification (MFA) which I strongly suggest you do. You’ll need a USB security key or to download and use the Oracle Authenticator app. It’s annoying to have to use another Authenticator app, but it’s worth the peace of mind.
Create a compute instance
Once you’re signed in to OCI, you’ll be at the Get Started page. Click on Instances under the Service Links.
On the next page, look for Compartment on the sidebar, and choose your Cloud Account Name from the dropdown menu.
Click the Create instance button and do the following:
Name your instance to whatever you want. (Or leave the default generated name if you prefer.)
Under the Placement section, just leave it default. Note that Ampere A1 instances can use any availability domain, while AMD E2 instances can only be created on the AD 3 availability domain. It should automatically default to the right one depending on your Shape choice, so you can ignore this.
Scroll down to Image and shape. The default image is Oracle Linux 9 and the default shape is VM.Standard.A1 Flex — as explained above, this shape is nearly impossible to get and is almost always “out of capacity.” You can upgrade your Oracle account to Pay As You Go to make it accessible, but we’ll just go with E2.1.Micro instead which is also free-tier and is always available.
First, if you don’t want to use Oracle Linux, click on Change image and choose a different one. I suggest Ubuntu, click on it and then choose the image name Canonical Ubuntu 24.04 Minimal, this is the latest version of Ubuntu and minimal means no extra bloat. (If using the Ampere A1 Flex shape, make sure you choose an image that says aarch64, since Ampere instances uses Arm CPUs — for E2.1.Micro which uses an AMD CPU, you need to choose an image that doesn’t say that.)
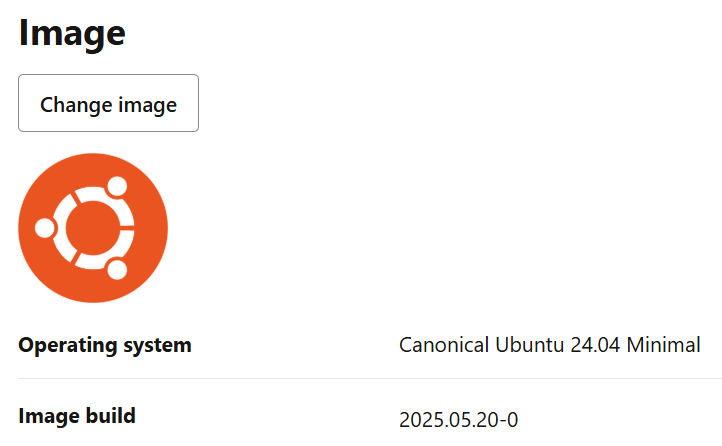
- By choosing the Ubuntu 24.04 Minimal image, it should have automatically changed the shape to VM.Standard.E2.1.Micro — if it did not, click on Change shape and choose it. Also, make sure Instance type is Virtual machine and NOT bare metal. Click on the Select shape button to confirm your choice.

If provisioning an Ampere A1 Flex instance, click on the arrow to the left of the Shape name to change the number of OCPUs and amount of memory, as you increase the OCPU it will also increase the memory automatically.
Leave the rest of the options as-is and click on the Next button at the bottom-right.
Under the Security section, read what it says and make your choice. Personally I always leave the toggle for Shielded instance at OFF. The toggle for Confidential computing will always be grayed out because free-tier shapes don’t support it. Click on the Next button at the bottom-right.
Under the Networking section, you can customize your VNIC name, subnet, IP addresses, etc. Or just leave it all to be automatically assigned as is the default, I usually do.
Scroll down to Add SSH keys. You can upload your own public key, or you can let it generate a key pair for you, which is the default. If you choose the default option, make sure you download the public and private keys, you’ll need them to SSH into the VM! When done, click on the Next button.

Under the Storage section, I just leave everything as default. A 46.6 GB boot volume is automatically included with the instance, but if you want it to be a larger size, turn on the toggle and choose a larger size. Note that the free-tier limit is 200 GB, which is shared between ALL instances, so be sure not to go over this! I usually just leave this as default. (I also never mess with the Boot Volume Performance and suggest you don’t either, unless you know what you’re doing.)
If you’ve made a Block volume separately (this also falls under the combined 200 GB of space for all instances) you can attach it here. I don’t use block volumes, and it’s not necessary for our purposes here, so just leave it alone. Click on Next.
Under the Review section, you’ll see all the details of your choices made thus far. If everything looks good, click on the Create button at the bottom-right.
Once the instance is fully provisioned and shows Running, you’re good to go. Click on it and look for Public IPv4 address, take note of this!
SSH into instance
We’ll assume you generated a key pair and downloaded the private key to your Downloads folder. In your Linux terminal, or if using Windows in Powershell or Windows Terminal, use the following command: (Obviously, use the correct filename of your SSH key, it’ll have the date you created it on in the name. You can rename this key file if you want.)
ssh -i ~/Downloads/ssh-key-2024-01-30.key ubuntu@<Instance Public IP>
For the future, you should create or edit the ~/.ssh/config file, and add in something like the following:
Host oracle
    HostName <Instance Public IP>
    IdentityFile ~/Downloads/ssh-key-2024-01-30.key
    User ubuntu
Then you’ll be able to SSH into your Oracle instance by just doing ssh oracle. Once you’re logged in to your Oracle instance’s terminal, let’s make sure everything is up-to-date.
sudo apt update && sudo apt upgrade -y
We’re done in the Oracle instance for now, but we’ll be back soon.
Set up Tailscale
Go to the Tailscale website and create an account. This will create your Tailnet (private mesh network for all your Tailscale-connected devices) with your newly created account as the Owner and which you’ll manage through the web-based admin console on the website.
Once you’ve got the account ready, use the following command in both the server where you’re running Plex and the Oracle instance:
curl -fsSL https://tailscale.com/install.sh | sh
Once it’s finished installing, use the command sudo tailscale up on both your server and the Oracle instance, go to the provided URLs and login to add both machines to your tailnet. Now go to the Tailscale admin console and you should see them both there.
Note that each machine running Tailscale has a unique Tailscale IP and hostname. We’ll need these later.
Configure DNS in Tailscale
On the admin console go to the DNS tab.
First, notice the Tailnet name is something auto-generated like tailfe8c.ts.net. You can keep this if you want, but instead we’ll change it to a “fun name” that is more human-readable and easier to remember. You can’t just type one in, you choose from ones generated by Tailscale.
Click the Rename tailnet… button and follow the prompts. You can keep reloading until you find a fun name you like. For future examples, we’ll assume your tailnet name is cetacean-nessie.
Scroll down to the end of the page and click the Enable HTTPS button. Now we can provision TLS certificates for machines in your tailnet, so that you can reach them at https://<name>.cetacean-nessie.ts.net.
In the terminals for each machine — the Plex server and the Oracle instance — use this command to generate the certificates:
sudo tailscale cert <name>.cetacean-nessie.ts.net
From here on out we’ll assume the Plex sever is plex.cetacean-nessie.ts.net and the Oracle instance is oracle.cetacean-nessie.ts.net.
Add and configure domain in Cloudflare
If you bought a domain on Cloudflare, you can skip this and move on to creating the DNS record since the domain will be auto-configured already.
If your domain is from another registrar, and you want to use Cloudflare for DNS like I do, we’ll need to create a free Cloudflare account.
Once your account is created, let’s add the domain to Cloudflare:
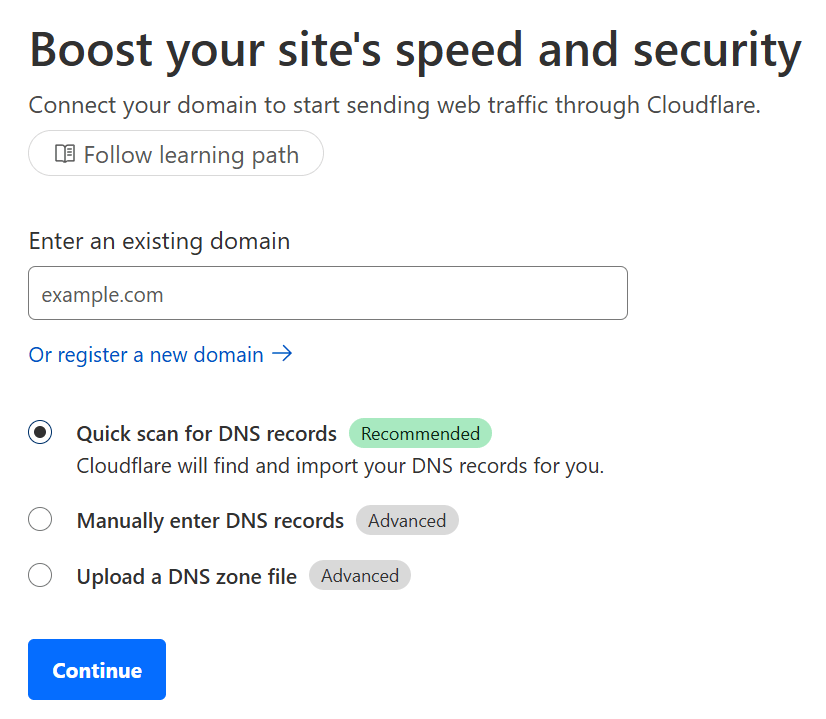
On the Cloudflare dashboard Account Home, click the + Add a domain button.
Enter your domain, leave Quick scan for DNS records selected, and click Continue.
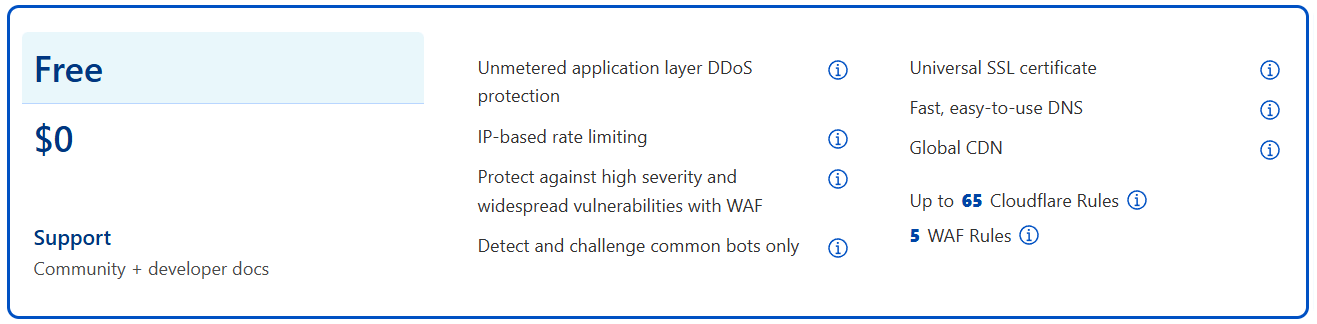
- Click on the Free plan at the bottom and click Continue.
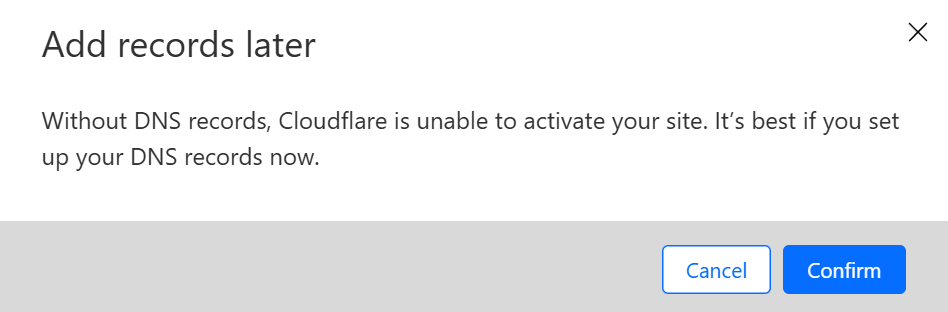
- You’ll see your DNS records, if there are any. Don’t worry about this right now and click on the Continue to activation button.
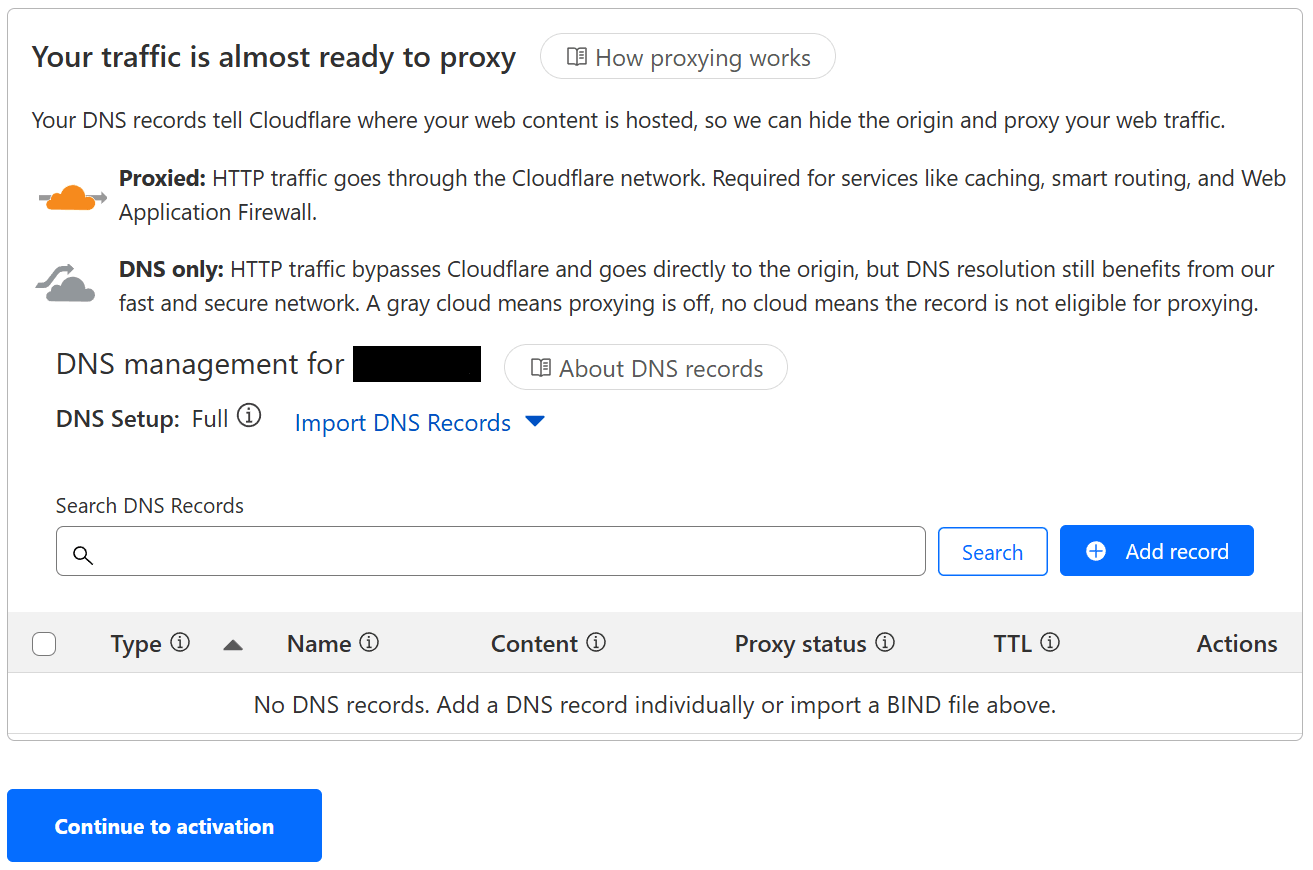
- You’ll see a pop-up window saying you should set your DNS records now, click on Confirm.
Now you’ll be provided some instructions to update the nameservers on your domain’s registrar, open a new tab and follow those instructions. Once you’ve added the Cloudflare nameservers at your registrar, go back to Cloudflare and click on Continue.
Now you’ll have to wait a few minutes for the changes to propagate, then click on Check nameservers and reload the page. If it’s still shows Pending next to the domain at the top, just keep waiting and reload again after a few more minutes.
Once the domain is active in Cloudflare, we just need to add a DNS record:
On the sidebar go DNS and click on Records from the dropdown.
Click on Add record.
For Type choose A from the dropdown menu.
For Name type in
your-domain.com.For IPv4 address type in the Oracle instance public IP.
Under Proxy status toggle it off to DNS only.
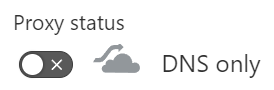
Make sure NOT to leave it proxied. If you do, all traffic will go through Cloudflare’s CDN which we do not want. We’re only using Cloudflare to resolve our domain to the IP of the Oracle instance, nothing more!
- Leave TTL at Auto and click Save.
Next, we need to create an API token to edit the DNS config from third-party apps, which is necessary to get a TLS certificate in the reverse proxy later.
On the Cloudflare dashboard Account Home, choose your domain.
In your domain overview, in the column on the right side of the page, scroll down to API and click on Get your API token.
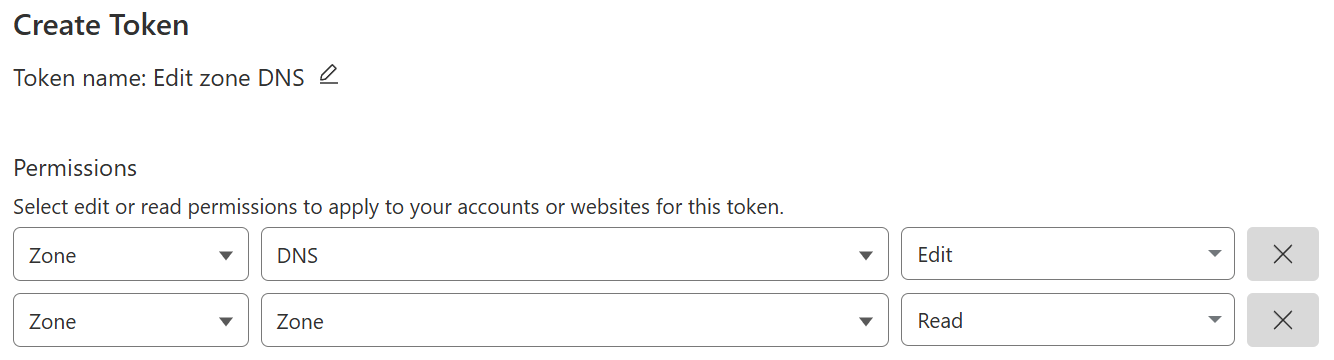
Click the Create Token button. The first template should be Edit zone DNS, click the Use template button next to it.

Under Permissions, leave the first entry as is, click on + Add more.
For the new Permission, choose in order from the dropdown menus Zone, Zone and Read.
- Under Zone Resources, leave the first two dropdown menus as is, and in the final dropdown all the way to the right, select your domain. Scroll past everything else,without changing anything else, click on Continue to summary, and finally on the Create Token button.

- On the next page you’ll see your API token, make sure to save it somewhere because it will not be shown again. We will need this API token to provision the TLS certificates in Nginx Proxy Manager.
Install reverse proxy on Oracle instance
Back in the Oracle compute instance, we’ll be setting up Docker to run Nginx Proxy Manager. If you know what you’re doing, feel free to use whatever reverse proxy you like, and run it however you like.
SSH into the instance and install Docker with the following command:
curl -fsSL https://get.docker.com | sh
We’ll use docker compose to run the reverse proxy container.
Create the data directory for the reverse proxy and change into it with
mkdir ~/nginxproxy && cd ~/nginxproxy(This assumes you’re using the defaultubuntuuser.)Create the compose file with
nano compose.yamland copy the below into it:
services:
 nginxproxy:
  image: docker.io/jc21/nginx-proxy-manager:latest
  container_name: nginxproxy
  volumes:
   - /home/ubuntu/nginxproxy:/data
   - /home/ubuntu/nginxproxy/letsencrypt:/etc/letsencrypt
  ports:
   - 80:80
   - 81:81
   - 443:443
  restart: always
- Save and close the file, then install and run the container with
docker compose up -d
Once it’s up and running, we need to access the Nginx Proxy Manager GUI, but for that we’ll need to open some ports on the instance to be accessible from your IP address.
Alternately, you can install Tailscale on your PC or tablet, then while it’s connected to Tailscale go to
https://oracle.cetacean-nessie.ts.net:81. This way you can just use Tailscale to access the web UI of Nginx Proxy Manager and any other apps you decide to run, without having to add ingress rules for those ports.
Add ingress rules on OCI
Connecting to the Oracle instance from the internet in any way requires adding ingress rules in the OCI dashboard. (Port 22 is the only default ingress rule so that you can access the instance via SSH.) You have two options here:
Allow access from the entire internet and setup authentication to block anyone that shouldn’t have access. (I won’t be covering this, though.)
Allow access only from specific IPs, including yours, and block everyone else. (If they go to your domain they will get a 403 error.) I strongly suggest this.
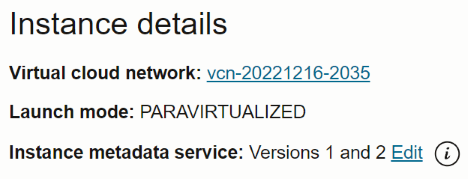
Under Instances, click on your instance, and under Instance details click on the link for Virtual Cloud Network, it should be something like vcn-20221216-2035.
In Subnets click on the only choice, something like subnet-20221216-2035. Finally, click on the Default Security List.

We’ll add ingress rules to allow your IP to access ports 81 (so you can reach the Nginx Proxy Manager web UI), 80 and 443.
- Click Add Ingress Rules

Leave the source type as CIDR.
Under Source CIDR type in your IP address in this format:
123.45.678.90/32.
If you need to find out your public IP address, just go to icanhazip.com.
Leave the IP Protocol as TCP.
Leave the Source Port Range as All.
Set the Destination Port Range to
81.Click on + Another Ingress Rule, do the same as above, but use
80as Destination Port Range.Click on + Another Ingress Rule and repeat one more time for
443as Destination Port Range.
Repeat the above steps for to open ports 80 and 443 for each IP address you want to allow remote access to Plex. You want to have ingress rules that allow each of your remote users to access both ports, for both HTTP and HTTPS connections.
Now we can access the Nginx Proxy Manager web UI and create our proxy host.
Add proxy host in Nginx Proxy Manager
You should now be able to reach the Nginx Proxy Manager web UI by going to http://your-domain.com:81. Login with the default [email protected] and changeme as the password. You’ll want to change that before anything else.
Click on Users on the top nav bar, then to the right of the Administrator entry click the three dots. Choose Edit Details to change the email and Change password to change password. Log out and back in with the new credentials.

Now to create a proxy host and provision the TLS certificate:
- On the Dashboard, click Proxy hosts and then Add proxy host.
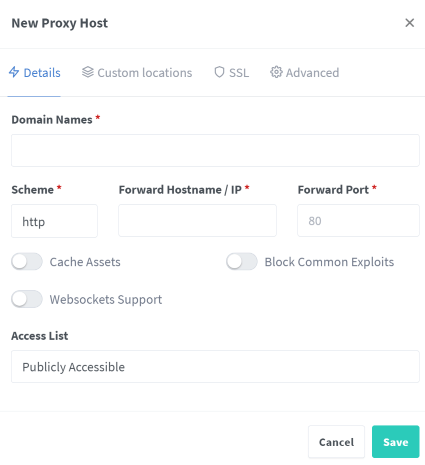
Type in
your-domain.comunder Domain Name.Leave the Scheme as http.
Type in
plex.cetacean-nessie.ts.netunder Forward Hostname/IP.Type in
32400under Forward Port.Toggle on Websockets Support and Block Common Exploits, but leave caching off.
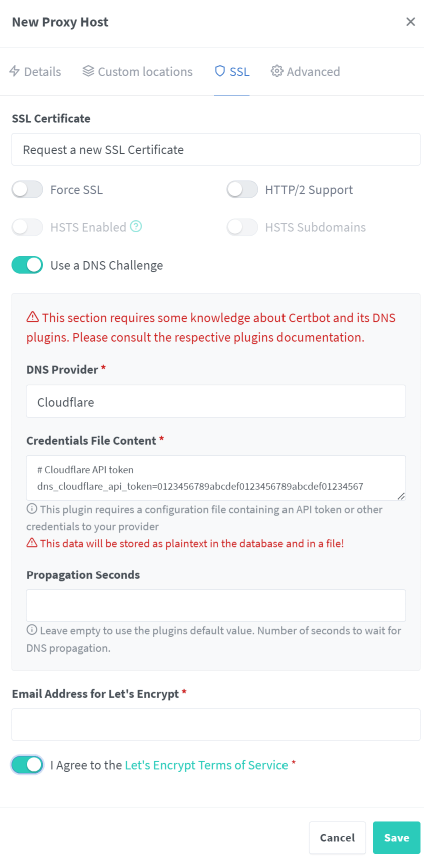
Go to the SSL tab and choose Request a new SSL Certificate from the dropdown menu.
Enable only the toggles for HTTP/2 Support and Use a DNS Challenge.
Choose Cloudflare as DNS Provider from the dropdown menu.
In the credentials file content, delete the numbers after
dns_cloudflare_api_token=and add in your API token instead.Type in your email address and enable the toggle to agree to the Let’s Encrypt TOS, and click Save.
Give it a minute or two for Let’s Encrypt to provision the TLS certificate, and the proxy host will then be created. If you added ingress rules for your IP to access ports 80 and 443, you should now be able to reach the Plex web UI at https://your-domain.com. Almost done!
Configure the Plex server
Already anyone you share your library with can access it by going to https://your-domain.com, but this way they can only play media on a browser. Let’s also let them play your shared media from Plex apps on their phones, smart TVs, and other devices.
On the Plex web UI, go to Settings by clicking on the wrench icon at the top-right.
On the sidebar, scroll down to Settings and click Network.
Next to Secure connections, choose Preferred from the downdown menu.

(Optional) Scroll down and enable the checkbox for Treat WAN IP as LAN Bandwitdh.
Make sure to leave disabled the checkbox for Enable Relay.

- Under Custom server access URLs type in
https://your-domain.com. (Make sure to include the HTTPS!) As a backup, you may also want to add your Tailscale IP ashttp://100.200.300.400:32400. (I leave it as HTTP in case sometimes a secure HTTPS connection is not possible, since I trust the IPs and devices connecting.)

At the bottom of the page, click the Save changes button. Now that apps can connect, let’s finally share the library with someone!
Go back to Settings and click on Manage Library Access.

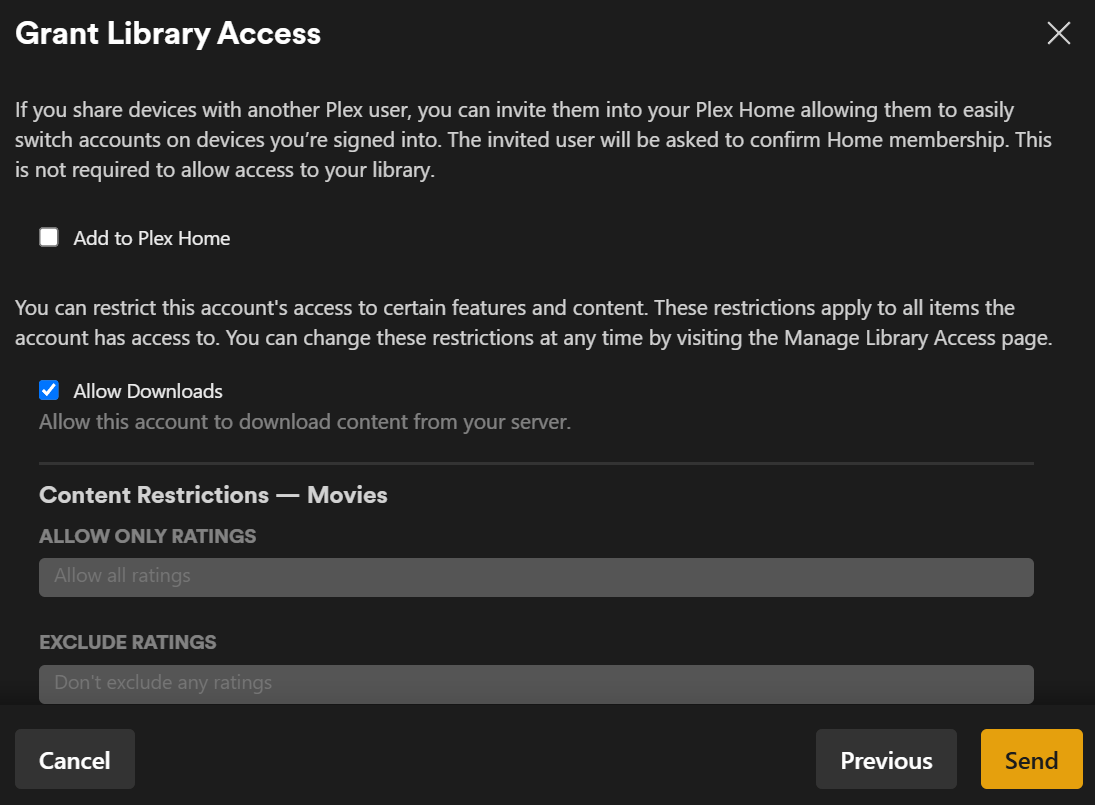
Click on Grant Library Access and type in your friend’s email address, and click on it under Search Result. (If they already have a Plex account, there will be a green checkmark.) Then click Continue.
Now click on the checkmarks for the libraries you want to share, or click on the checkmark next to your server name to share all libraries. Then click Continue
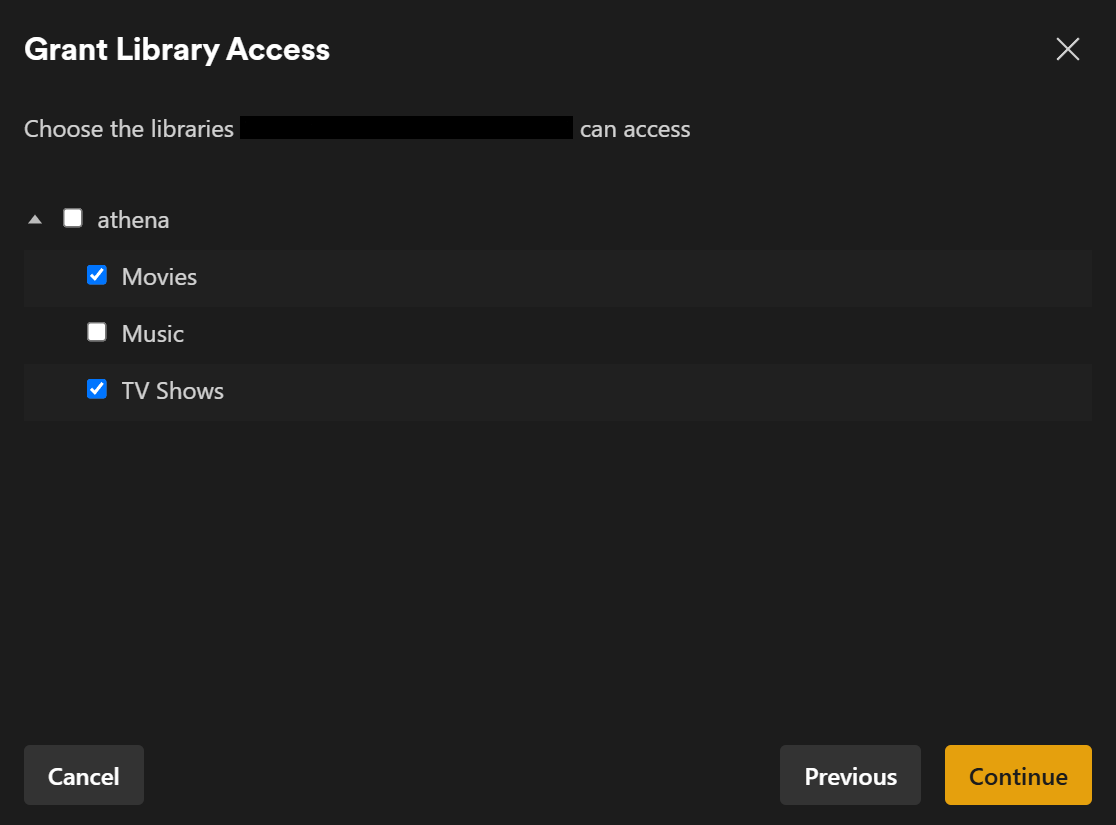
- On this final page, click Send. If you have Plex Pass, you’ll get additional options to add the user to your Plex Home (not necessary in our case), allow downloads, and also setup more fine-grained restrictions. You can ignore these options if you want.
Now your friend will get an email invitation and once accepted they’ll be able to access your Plex library both from their apps and by going straight to your domain on a browser to reach the web UI.
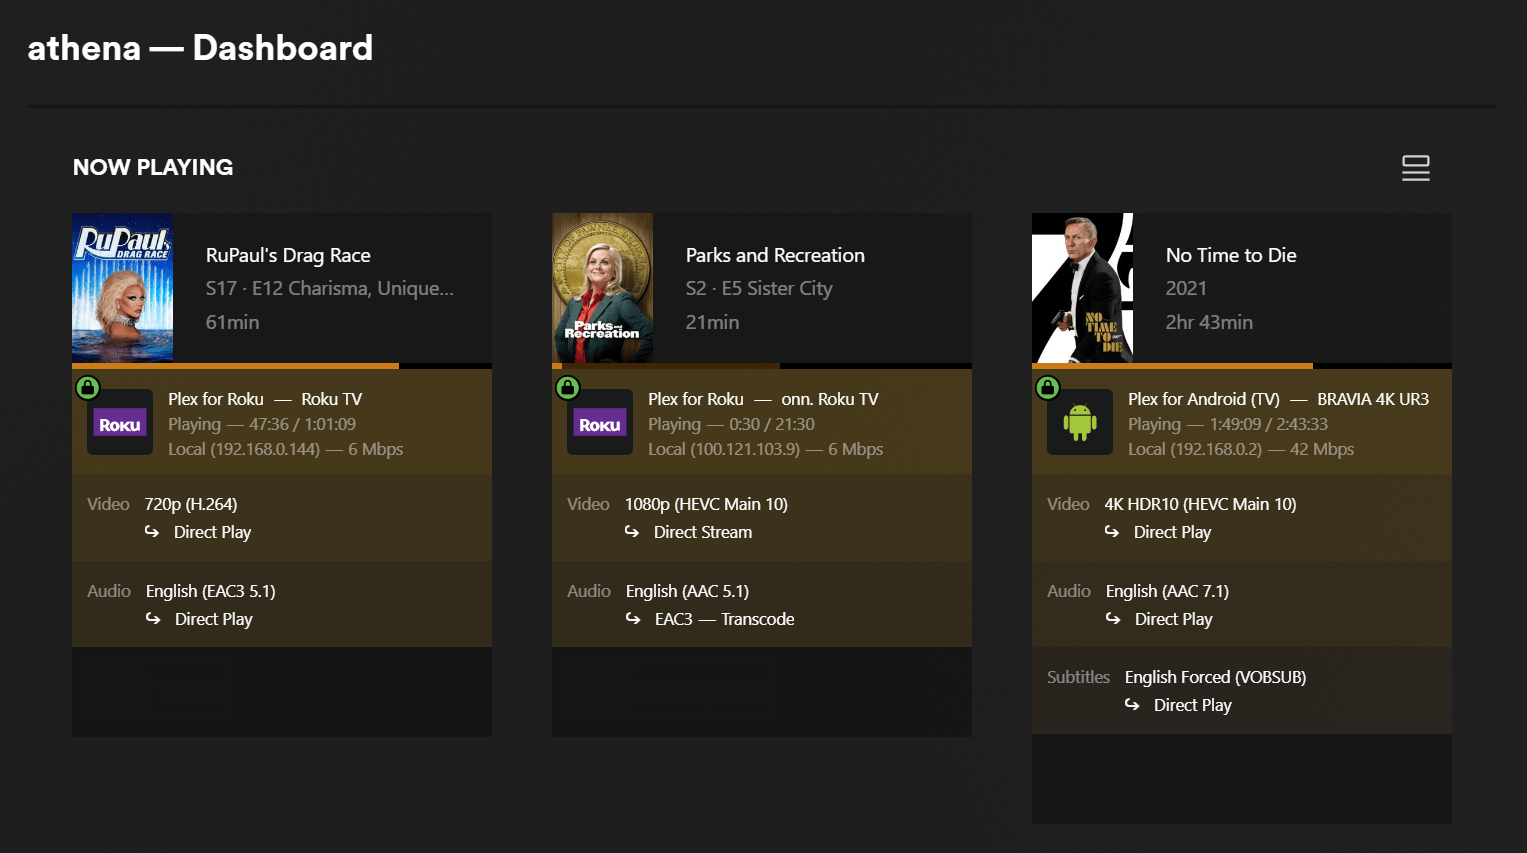
Once your friend starts streaming, they’ll show up on your Plex dashboard under the Tailscale IP of the Oracle VM, and it will be considered a local IP. See the screenshot below and notice the 100.x.x.x IP.
[warning] Important
If you have an active Plex Pass subscription, or the users you’re sharing library with have an active Remote Watch Pass subscription, then you’re done. The user you’ve shared library to should be able to access your Plex library.
However, without Plex Pass additional configuration is required, as detailed below.
Using the Plex server as subnet router and exit node
As explained above, the following is required in order for this to work without a Plex Pass or Remote Watch Pass subscription. If you do have Plex Pass, or the users you’re sharing with have Remote Watch Pass, then this isn’t necessary.
First, in order to use either subnet routing or exit node, you need to enable IP forwarding on the server. (This is straight from the Tailscale documentation.)
If your machine has an /etc/sysctl.d directory (which most likely it does) then use these commands:
echo 'net.ipv4.ip_forward = 1' | sudo tee -a /etc/sysctl.d/99-tailscale.conf
echo 'net.ipv6.conf.all.forwarding = 1' | sudo tee -a /etc/sysctl.d/99-tailscale.conf
sudo sysctl -p /etc/sysctl.d/99-tailscale.conf
If your machine does NOT have the directory (ls /etc/sysctl.d returns No such file or directory) then instead use these commands:
echo 'net.ipv4.ip_forward = 1' | sudo tee -a /etc/sysctl.conf
echo 'net.ipv6.conf.all.forwarding = 1' | sudo tee -a /etc/sysctl.conf
sudo sysctl -p /etc/sysctl.conf
Also, if you are running firewalld on your server, you should allow masquerading with the following command:
sudo firewall-cmd --permanent --add-masquerade
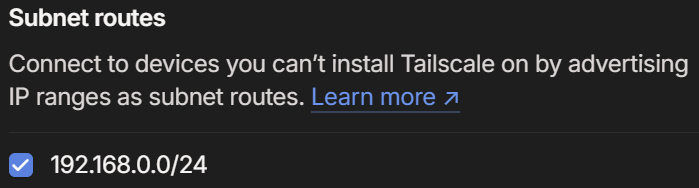
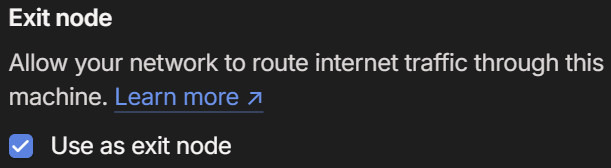
Now we’ll advertise both the subnet routes and the exit node with this command: (This assumes your local IP addresses are 192.168.0.x, make sure to use the appropriate subnet for your LAN!)
sudo tailscale up --advertise-routes=192.168.0.0/24 --advertise-exit-node
Now go to the admin console, on the Machines tab, and do the following:
Click the three dots to the right of the machine want you want to use as subnet router. (Notice the
subnetstag.)Choose Edit route settings… from the dropdown menu.
Click both checkboxes for Subnet routes and Use as exit node, then click the Save button to finish.
Now, we have to set the Oracle VM to use your Plex server as exit node. SSH into it and use the following command in the terminal:
sudo tailscale up --exit-node=<ip or machine name>